Lash Hub Blog Posts

Lash Extension Allergy: Symptoms, Causes and What to Do
Lash extension allergies are not common — but they do happen, and when they happen, they need to be taken seriously. The challenge for both clients and lash artists is that real allergic reactions can look very similar to ordinary irritation, and getting the diagnosis wrong leads to wasted appointments, lost trust, and (in serious cases) genuine eye damage. This guide explains exactly what a lash extension allergy looks like, what's actually causing the reaction, how to tell allergy apart from simple irritation, what to do if it happens to you, and how lash artists can reduce the risk for clients prone to sensitivity. First, the Honest Statistics Genuine allergic reactions to lash extensions are estimated to occur in 1 to 2 percent of clients — not 10 or 20 percent as social media sometimes suggests. The vast majority of "allergic reactions" people post about online are actually irritation reactions, which look similar but are caused by different things and respond to different treatment. The important distinction: allergy is your immune system reacting to a specific substance. Irritation is your tissue reacting to a physical or chemical trigger. They look similar on the outside but require completely different responses. The Difference Between Allergy and Irritation Irritation (the most common reaction) Irritation reactions typically: Show up within minutes to hours of the appointment. Cause mild redness, watering, and a stinging sensation. Resolve completely within 24–48 hours on their own. Affect both eyes equally. Are usually caused by adhesive fumes during application or contact with the skin during the appointment. Allergic reaction (rarer, more serious) Genuine allergic reactions typically: Develop 24–72 hours after the appointment (sometimes longer). Cause significant swelling of the eyelids. Produce intense itching that doesn't ease with eye drops. Cause redness that spreads beyond the lash line onto the eyelid and surrounding skin. May be worse on the second appointment than the first — allergies develop with repeated exposure. Don't resolve until the trigger is removed. What Causes a Lash Extension Allergy? The most common trigger in lash extension allergy cases is the adhesive used during application — specifically the cyanoacrylate-based bonding agents or carbon-based pigments that give the glue its dark colour. Other potential triggers include: Cyanoacrylate (bonding agent): the primary sensitising component in most lash adhesives Carbon black pigment: used to darken adhesive, may cause sensitivity in some clients Latex in tapes or pads: can trigger reactions in clients with latex allergies Formaldehyde release: trace amounts may be released as adhesive cures, especially in poorly stored or expired products Pre-treatment products: primers, cleansers, or removers in sensitive individuals Rare cases: sensitivity to eye pads, tape adhesives, or environmental factors The lash extensions themselves (PBT fibre) are considered highly biocompatible and rarely a cause of allergic reactions. Symptoms of a Lash Extension Allergy If you experience any combination of these symptoms 24–72 hours after a lash appointment, you may be having an allergic reaction: Swollen, puffy eyelids — sometimes severely puffy. Intense itching that drives you to rub your eyes. Redness across the eyelid and lash line. Watering eyes that won't stop. Discharge from the eye (clear or yellow). A burning or stinging sensation that doesn't ease. Skin around the eye that's hot to touch. In severe cases, the eye may swell shut. What to Do If You Have a Reaction (Client Guide) Don't rub your eyes. Rubbing makes everything worse and risks damaging the cornea. Contact your lash artist immediately. They need to know — partly so they can help you, partly so they can stop the same thing happening to other clients with the same adhesive batch. Apply a cold compress for 10–15 minutes at a time to reduce swelling. Use a clean cloth — never ice directly on the skin. Use saline eye drops to rinse and soothe the eye area. Avoid eye drops with active ingredients (redness reducers, lubricants) unless prescribed. Seek medical advice from your GP, pharmacist, or healthcare provider. They can properly assess the reaction and recommend appropriate treatment based on your individual circumstances. For severe reactions, arrange professional lash removal as soon as possible. Removing the extensions helps eliminate ongoing exposure to the adhesive and may assist with recovery. Seek urgent medical attention immediately if you experience severe swelling, vision changes, significant pain, difficulty opening your eyes, or any symptoms that rapidly worsen. Have the extensions professionally removed. Don't try to remove them at home — this risks damage to your natural lashes. Your lash artist (or another professional) can do a safe removal. What to Do If Your Client Has a Reaction (Lash Artist Guide) As a lash artist, your duty of care is real. Here's the professional response: Listen and take it seriously. Even mild reactions deserve full attention. Get a clear description and photos. Document the reaction for your records. Offer a free professional removal. Standard professional response in this situation. Refer to a doctor or pharmacist if symptoms are significant. You are not a medical professional. Refund where appropriate. Builds long-term trust — even when the reaction may not be your fault. Update your client intake form to flag this client for future appointments and document any product they reacted to. How to Reduce Allergy Risk Reducing the risk of lash extension irritation and allergic reactions requires a combination of correct technique, controlled environment, and professional product selection. While no system can completely eliminate sensitivity risks, lash artists can significantly reduce complications by following structured lash protocols. For lash artists Always use fresh, properly stored adhesive (never expired or contaminated) Conduct patch testing for new or sensitive clients Maintain proper ventilation to reduce fume exposure Ensure adhesive does not touch the skin (0.3–0.5 mm placement rule) Use latex-free tapes and pads as standard practice Educate clients on the difference between irritation and allergic reaction Avoid overloading adhesive, which increases fume exposure For clients Tell your artist about any allergies (cosmetic, environmental, medication) before booking. Ask for a patch test if you've had a reaction to anything similar in the past. Avoid getting lash extensions immediately after a major skincare change or new medication. Don't have lash extensions applied right before a major event — book a trial set first so any reactions appear before the big day. How Patch Testing Works A patch test is exactly what it sounds like — a small test before the full appointment. The protocol: 7. Apply a small number of extensions (typically 3–5) using the actual adhesive you plan to use for the full set. 8. Wait 24–48 hours. Allergic reactions usually appear within this window. 9. Inspect the area for redness, swelling, itching, or other reactions. 10. If no reaction, proceed to the full set. If any reaction, discuss alternative products with your artist before continuing. 11. Advise the client that they may still react after a full set even if they are clear on the patch test. Patch testing isn't perfect — some allergies only develop after repeated exposure — but it dramatically reduces the risk of a full-set reaction. Sensitive Products in the Posh Deluxe Range For clients with known sensitivities or a history of irritation, selecting appropriate professional products can help support a more comfortable lash application process. At Posh Deluxe Lash Supply, we offer a range of products designed to support cleaner application, improved retention, and better-controlled working environments for lash professionals. Anti Allergy Gel — Designed to help reduce the presence of airborne adhesive fumes in the lash workspace. It is commonly used in professional studios to support a more comfortable treatment environment during application. Important: This product is an environmental support tool only and does not prevent or treat allergic reactions or sensitivities to lash adhesives. Bond Babe Adhesive — A professional-grade adhesive designed for strong retention with reduced fume levels compared to standard lash glues. Suitable for classic, promade, and volume lash applications. Posh Deluxe Lash Shampoo — A professional-grade adhesive designed for strong retention with reduced fume levels compared to standard lash glues. Suitable for classic, promade, and volume lash applications. Wrap Perfecto — A professional pre-treatment product that prepares the natural lashes by removing excess oils and improving adhesive performance for more precise application results. Superbonder - A professional retention and curing enhancer that helps seal adhesive bonds, reduce residual fumes, and improve lash retention. Often used as a finishing step to create a more comfortable experience for sensitive clients while strengthening the longevity of lash extensions. Frequently Asked Questions Can you be allergic to lash extensions? Yes — though true allergic reactions are rare, affecting an estimated 1–2% of clients. The most common allergen is cyanoacrylate (the bonding agent in lash adhesive). Reactions typically appear 24–72 hours after the appointment. What does a lash extension allergy look like? Significant swelling of the eyelids, intense itching, spreading redness on the eyelid and surrounding skin, and watering or discharge. Symptoms typically appear 24–72 hours after application and don't resolve until the adhesive is removed. How is allergy different from irritation? Irritation appears within minutes to hours, causes mild redness and stinging, and resolves within 24–48 hours on its own. Allergy appears 24–72 hours after application, causes significant swelling and itching, and doesn't resolve until the trigger is removed. Can I become allergic to lash extensions after having them before? Yes. Allergies often develop with repeated exposure. Many clients have their first set without issue and develop a reaction on a later appointment as their immune system builds sensitivity over time. Is there a hypoallergenic lash adhesive? There's no truly hypoallergenic lash adhesive — all cyanoacrylate adhesives carry some allergy risk for sensitised clients. However, low-fume, low-formaldehyde-release formulations like Bond Babe Adhesive are gentler choices for sensitive clients. What should I do if my client is having a reaction during the appointment? Stop the appointment immediately, gently rinse the eye area with saline solution, apply a cold compress. If symptoms are severe (significant swelling, eye swelling shut, severe pain), refer to urgent care or hospital immediately. Do not attempt to remove the extensions yourself if the client's eyes are reactive — wait for the swelling to subside. Can I patch test myself at home? No. Lash adhesive should never be used outside a professional setting. A proper patch test should always be done by a qualified lash artist. The Bottom Line Lash extension allergies are real but uncommon — and the vast majority of "allergic reactions" are actually short-lived irritations. Knowing the difference matters for both clients and lash artists. If you experience genuine allergy symptoms, get the extensions professionally removed, take an antihistamine, and consider patch testing before your next appointment. Lash artists should make patch testing routine for sensitive clients, stock low-fume adhesive options on hand. Browse the full Posh Deluxe range or contact us if you have specific questions about sensitivity.
Learn more
How to Choose the Right Lash Shampoo: The Complete Australian Guide
The single biggest mistake clients make with their lash extensions has nothing to do with the artist who applied them. It has nothing to do with the products used. It has nothing to do with the weather. It's the moment, on Day 1, when they get home — and decide not to wash their lashes because they're scared of touching them. For the next three weeks, makeup, sweat, sunscreen, dead skin cells and natural facial oil quietly build up at the base of every single extension. By week two, the adhesive bond is being eaten away from underneath. By week three, half the set is gone — and the client is convinced their lash artist did something wrong. This is why lash shampoo isn't optional. It's the single most important aftercare product your clients will ever buy — and the wrong one can be just as damaging as not washing at all. Why Lash Shampoo Isn't Optional Three things happen at the base of lash extensions every single day, and they all need to be removed: Sebum (your natural skin oil). Your face produces oil constantly — even more in hot Australian summers. Sebum slowly breaks down cyanoacrylate (the adhesive that holds extensions to your natural lashes). Makeup, sunscreen, and cleanser residue. Even small amounts of foundation, primer, eye cream or moisturiser migrate down to the lash base over the course of a day. Dead skin cells. They build up at the lash line, become food for microscopic lash mites (Demodex), and quietly weaken the bond. When clients don't wash their lashes daily, retention drops by up to 50%. The set that should have lasted six weeks is gone in three. Eye infections become more likely. The base of the lashes feels gritty. And, often, the lash artist takes the blame for what is actually a hygiene issue. The bottom line: daily lash washing isn't an optional extra. It's the difference between a set that lasts and a set that doesn't. Why Regular Face Wash and Makeup Remover Are Dangerous This is where most clients go wrong. They assume "I already wash my face every day, that should be enough." Unfortunately, almost every standard skincare product is the worst possible choice for lash extensions: Most face washes contain oil. Even ones marketed as "oil-free" often contain emollients (squalane, glycerin, butter, silicones) that behave like oil on the lash bond. Eye makeup remover is almost always oil-based. It's designed to dissolve waterproof mascara — which is the same chemistry as dissolving lash adhesive. Makeup wipes deposit cotton fibres into the lashes and require rubbing — which physically tears extensions out. Bar soap is too alkaline. It strips the natural pH balance of the lash and skin around the eye. Some "gentle" cleansers contain niacinamide or retinol. Both can interact with lash adhesive over time. A purpose-made lash shampoo is the only product that's been formulated specifically to clean lash extensions without degrading the adhesive bond. This is not marketing fluff — the chemistry actually matters. The Five Things to Look for in a Quality Lash Shampoo 1. Oil-free (read the ingredients, not the marketing) The label says "oil-free" on almost every lash shampoo on the market. But the ingredient list often tells a different story. Look out for hidden oil-like ingredients: squalane, glycerin in high concentration, plant butters, silicone derivatives (anything ending in -cone or -siloxane), and mineral oil. 2. Sulphate-free Sulphates (SLS and SLES) are harsh detergents commonly used in regular shampoos. They strip the natural protective oil layer on the lash hair and can cause irritation in the delicate eye area. Quality lash shampoos use gentler surfactants. 3. Paraben-free Parabens are preservatives that have been linked to skin irritation, especially around the eye. Modern lash shampoos use safer preservation systems. 4. pH-balanced The natural lash sits at a slightly acidic pH (around 4.5 to 5.5). A quality lash shampoo matches that — strongly alkaline cleansers disrupt the lash hair and adhesive surface. 5. Designed specifically for lash extensions Some brands take a generic face cleanser, rebrand it as a "lash cleanser," and sell it at a premium. A genuine lash shampoo is formulated from scratch for use with cyanoacrylate adhesive bonds — not adapted from a different category. Foam vs Liquid: What's the Difference? Most professional lash shampoos come in one of two formats: Foam (pump dispenser): Easier for clients to apply, less waste, lower risk of over-saturation. Foam is pre-diluted to the perfect concentration, meaning your client gets consistent results every wash. This is the better choice for home retail. Liquid (concentrate): More precise for professional use. Lash artists often dilute liquid concentrate for in-salon pre-treatment cleansing. Posh Deluxe Lash Shampoo comes in a 60ml foam dispenser — see product — designed specifically for daily home use by clients. How to Apply Lash Shampoo Properly Step-by-step process for clients to follow every day: Wet the eye area lightly with cool or lukewarm water — never hot. Pump foam onto a clean lash brush (a soft fan brush or a dedicated lash cleansing brush — never your fingertips). Close your eye gently and sweep the brush downwards over the closed lid and along the lash line. Focus on the base of the lashes — that's where the cleaning happens. Continue with gentle side-to-side motions along the lash line. Never rub up and down the body of the lashes. Rinse with cool water until all the foam is gone. Look down into the basin or shower — don't tilt your head back. Pat dry with a soft microfibre cloth. Never rub with a regular towel — the loops snag on extensions. Brush the lashes once dry with a clean spoolie to fan them out and reset the curl. Tip: buy a pack of disposable cleansing brushes for your client — they're the best applicator and cost almost nothing per use. How Often Should Lash Extensions Be Washed? The honest answer: every single day. Here's the realistic guide: Once a day, every day: the absolute minimum. Twice a day: for clients with oily skin, or anyone who wears makeup daily. Immediately after sweating (gym session, hot day, hot yoga) — sweat is salt water + oil and is brutal on the adhesive bond. Always before bed if they've worn eye makeup — even a small amount of mascara residue overnight is enough to weaken the bond. The first 24 hours after application is the only exception — no water on the lashes during the initial cure period. From day 2 onwards, daily washing is essential. Common Lash Shampoo Mistakes Skipping it because the lashes feel fine. By the time they don't feel fine, the bond is already damaged. Wash daily regardless. Using fingers instead of a brush. Your fingers re-deposit oil and don't reach the base of the lashes where the cleaning needs to happen. Washing only the body of the lashes, not the base. The base is where sebum and product collect. Wash there. Hot water. Use cool or lukewarm — heat softens the adhesive over time. Not drying properly. Damp lashes attract more residue and can clump. Pat with microfibre and brush once dry. Rubbing instead of patting. Friction is the enemy of lash retention. Posh Deluxe Lash Shampoo: What Makes It Different Posh Deluxe Lash Shampoo comes in a 60 ml foam pump (with a bulk-buy option for high-volume salons). It's been formulated specifically for use with lash extensions in Australian conditions: Oil-free, sulphate-free, paraben-free. No hidden emollients. pH-balanced to match the natural acidic state of the lash surface. Foam format for easy, accurate at-home application. Tested in Australian conditions by Paola Yit and the Posh Deluxe team before being released to the catalogue. Pairs with disposable cleansing brushes for a complete retail bundle. For Lash Artists: Stocking Lash Shampoo as Retail Lash shampoo should be in every single client's hand when they leave their appointment. Not optional, not upsold reluctantly — built into the price and the experience. Here's why this matters for your business: It protects your work. Clients who wash daily come back rebooking infills, not complaining about retention. Repeat retail revenue. A 60 ml bottle lasts a typical client 6–8 weeks. That's a built-in restock cycle aligned with infill bookings. Healthy retail margins. Typical markup on lash shampoo is 40–60% — meaningful side revenue per appointment. Reduces "problem" clients. The single biggest cause of retention complaints is lack of home washing. Solve it at the source. Build it into your standard new-set price. Include a bottle plus brushes in every welcome kit. Tell every client: "This is what protects my work in your lashes for the next four weeks." They'll thank you. Frequently Asked Questions Can I use baby shampoo on lash extensions? No. Baby shampoo contains plant-derived oils and emollients that break down lash adhesive. The "tear-free" label refers to eye irritation, not lash compatibility. Can I use Cetaphil or a gentle cleanser on lash extensions? No. Cetaphil and similar "gentle" cleansers contain emollients (squalane, lanolin derivatives) that act like oil on lash extensions. Use a purpose-made lash shampoo. How long does a 60ml bottle of lash shampoo last? With daily use, a 60 ml bottle of foam lash shampoo lasts approximately 6 to 8 weeks for a single user — neatly aligned with the typical lash infill cycle. Does lash shampoo make extensions fall out faster? The opposite. Proper lash shampoo extends retention significantly. Clients who wash daily can see 50% better retention than clients who don't wash at all. Should I wash my lashes on Day 1 after application? No. The first 24 hours is the curing window — no water, no steam, no makeup. From Day 2 onwards, daily washing is essential. My lash shampoo stings my eyes — is that normal? No. A quality, pH-balanced lash shampoo should not sting. If it does, the formulation is too alkaline or contains harsh surfactants. Switch to a professional lash shampoo. Can I use lash shampoo on my face too? Yes, especially around the eye area. Many clients prefer it as their full eye-area cleanser because it removes makeup without the oil residue of dedicated removers. The Bottom Line Lash shampoo is the single highest-leverage aftercare product in your routine. Used daily, with the right product, you can stretch retention from 3 weeks to 6. Used wrong (or skipped), you'll be back in the lash chair every two weeks wondering why your sets aren't lasting. Shop Posh Deluxe Lash Shampoo or browse the full aftercare collection to build a complete home routine.
Learn more
How to Increase Lash Retention in Dry Winter Weather: The Complete Australian Guide
Every Australian lash artist knows the feeling. A set you applied perfectly during humid summer months suddenly behaves completely differently once winter arrives. The same adhesive, same products, same technique — but now the lashes are curing slower, retention feels inconsistent, and fans are closing unexpectedly. Different season, completely different result. The culprit is often winter dryness. As Australia moves into colder months, indoor heating, lower humidity, and dry air can dramatically affect how lash adhesive performs. Whether you're a lash artist struggling with retention during winter or a client wondering why your lashes suddenly feel different, understanding the role of humidity is essential. This guide explains: Why winter dryness affects retention How low humidity changes adhesive performance What lash artists should adjust during winter How clients can protect their lashes during dry weather Why Humidity Matters for Lash Retention Lash adhesive is built around a chemical called cyanoacrylate. To cure properly, it needs moisture from the air. That means humidity is not just one factor in retention — it’s one of the biggest. When cyanoacrylate meets airborne moisture, it polymerises and cures into a stable bond. The problem? Australian winter air is often too dry. When humidity drops too low: Adhesive cures slowly Bonds become weaker Stickies become more common Fans may close unexpectedly Retention becomes inconsistent Instead of the adhesive setting cleanly around the natural lash, the bond can remain tacky for too long, causing neighboring lashes to stick together. Winter Humidity in Australia: Why It Causes Problems During Australian winter, indoor heating and colder air can reduce salon humidity dramatically. Many lash artists are surprised to discover their studio humidity dropping below: 40% 35% Sometimes even below 30% Cities like: Perth Melbourne Canberra Adelaide can become especially dry during winter months, particularly inside heated rooms. This creates a very different environment compared to humid Australian summers. The Ideal Humidity Range for Lash Adhesive Most professional lash adhesives perform best at: 40–60% relative humidity Around 20–22°C When humidity drops below this range: Adhesive cures slower than intended Lash placement timing changes Retention may suffer Lash stickies become more common For example: A glue designed to cure in 1 second may suddenly behave like a 3-second adhesive in dry winter air. For Salon Clients: Why Winter Lashes Can Behave Differently Clients often assume summer is the hardest season for retention, but winter brings its own challenges. Dry Air Can Affect the Lash Bond Low humidity slows adhesive curing, which may lead to: Weaker bonds Premature shedding Extensions twisting more easily Indoor Heating Dries Out the Eye Area Heaters and air-conditioning can dry: The skin Natural lashes The eye area overall This can make lashes feel more brittle or delicate. Increased Eye Rubbing During Winter Winter allergies, dry eyes, and windy weather often lead to more rubbing around the eyes — one of the fastest ways to lose extensions. What you can do as a client to Improve Winter Lash Retention Wash your lashes daily with a proper lash shampoo — not regular face wash. Posh Deluxe Lash Shampoo is oil-free and designed specifically for extensions. Avoid oil-based skincare and cleansers anywhere near your eyes. Pat dry — never rub. Sleep on your back where possible (or use a silk pillowcase to reduce friction). Wait 4 hours after a workout before getting your lashes wet. Book infills every 2–3 weeks during summer, not 3–4 weeks. Shop a proper home-care kit: aftercare collection. For Lash Artists: How to Handle Low Humidity in Winter Winter retention problems are often environmental — not technical. The key is adjusting your routine to match the conditions. Step 1: Measure Your Room Conditions This is non-negotiable. Every lash studio should have a digital thermo-hygrometer to track: Humidity Temperature Conditions can shift throughout the day depending on: Heating Weather Number of clients in the room Without measuring your environment, you’re guessing. Step 2: Choose the Correct Adhesive Many artists continue using the same adhesive year-round, but adhesives behave differently in winter. Low Humidity (Below 40%) Use: Slightly slower-curing adhesives Retention-support products Adhesive accelerators if needed At Posh Deluxe, artists often pair their adhesive with: Adhesive Booster to help accelerate curing in dry conditions Wrap Perfecto for better lash preparation and pH balancing Step 3: Add Moisture Back Into the Room During winter, many studios actually need to increase humidity slightly. Helpful tools include: Humidifiers Hygrometers Controlled heating The goal is consistency — not excessive moisture. Step 4: Adjust Your Adhesive Routine In dry winter conditions: ✔ Replace glue drops more frequently - Even if the glue appears fresh, dry air changes how adhesive behaves over time. ✔ Work slightly slower if needed - Low humidity can delay curing. ✔ Use proper pre-treatment - Clean lashes improve adhesive bonding significantly during winter. The Winter Pre-Treatment Routine That Improves Retention At Posh Deluxe, proper pre-treatment is one of the biggest retention game changers during winter. Recommended winter prep routine: Cleanse lashes thoroughly Remove oils and residue completely Use Wrap Perfecto to rebalance the lash surface Ensure lashes are fully dry before application Apply Adhesive Booster if needed for low humidity support This helps create a cleaner, more stable bond in dry air conditions. Aftercare Matters Even More in Winter Clients often think winter is “safe” for lashes because there’s less sweating and swimming. But dry conditions still affect retention. Winter Lash Aftercare Tips ✔ Clean lashes daily - Build-up still affects retention during winter. ✔ Avoid excessive heater exposure - Direct heat can dry the lashes and eye area. ✔ Brush lashes gently - Dry lashes can tangle more easily. ✔ Stay hydrated - Hydration supports healthy skin and lashes overall. Frequently Asked Questions What is the ideal humidity for lash extensions? Most professional adhesives are formulated for 40–60% relative humidity at 20–22°C. Can cold weather affect lash extensions? Yes. Cold weather itself is not usually the problem, but the dry indoor air and heaters during winter can affect both the adhesive bond and the condition of the natural lashes. This can lead to dryness, tangling, or slightly weaker retention if aftercare is neglected. How often should I get infills during Australian winter? Most clients should still book infills every 2–3 weeks during winter to maintain fullness and balance. Dry air, indoor heating, and increased eye rubbing from seasonal dryness can still affect retention, even without summer sweat and swimming. What is the best lash adhesive for Australian winter? During dry winter conditions, many lash artists benefit from adhesives designed to perform more consistently in lower humidity environments. Pairing your adhesive with products like Adhesive Booster and proper pre-treatment can help improve curing speed and retention during colder months. For Australian winter conditions, Bond Babe Adhesive and Supreme Bond Adhesive are popular choices among lash artists looking for reliable retention and stable performance in drier studio environments. Do I really need a hygrometer in my studio? Yes. Without measuring your actual humidity at application time, you're guessing — and guessing is the number-one cause of inconsistent retention. Posh Deluxe stocks a digital thermo-hygrometer for under $25. Can heaters affect lash retention? Yes. Indoor heating can significantly reduce humidity levels and dry out the lash area. Should lash artists use a humidifier in winter? In many Australian salons, yes. A humidifier can help stabilise room conditions during very dry winter months. The Bottom Line Australian winter may feel easier than humid summer weather, but dry air creates its own retention challenges. The artists who get consistent retention year-round are the ones who measure their environment, choose their adhesive for the conditions, and follow a tight pre-treatment and aftercare routine. At Posh Deluxe, every adhesive, primer, booster, and aftercare product in our range has been designed and tested in Australian conditions — including dry winter environments. ✨Shop the humidity-proof retention range Adhesives Pre-treatment & Wrap Perfecto / Wrap Perfecto 15 ml Aftercare & Lash Shampoo Climate tools: digital thermo-hygrometer Full retention collection Designed to help artists achieve more consistent retention all year round.
Learn more
How to Remove Eyebrow Dye Safely: A Professional Guide for Brow Artists
Every brow artist knows the feeling: the service is complete, the tint is revealed, and you notice a slight stain on the skin outside the brow shape. While professional tinting is designed to be precise, even the most experienced artists occasionally need to tidy up. The good news is that eyebrow dye usually fades naturally over time—but there are also safe professional techniques that can help soften or remove excess pigment more quickly. Knowing how to remove eyebrow dye—or "tint"—from the skin safely is a fundamental skill that maintains the reputation of your professional services. At Posh Deluxe, we’re breaking down the safest ways to manage eyebrow dye removal while protecting both the skin and brow hairs. Why Brows Can Sometimes Look Too Dark Immediately after a brow treatment, results often appear darker than expected. This is especially common with hybrid brows, brow stains, and fresh tints. Because the dye sits on both the brow hairs and the skin underneath, the colour initially appears more intense. Over the next few days, the skin stain naturally softens while the brow hairs retain the colour longer. Why Hybrid Brows Stain More Deeply Hybrid brow systems are specifically designed to stain both the hair and the skin. This dual staining effect is what creates the popular defined brow effect, makeup-like finish, and longer-lasting result. Because of this, hybrid brows naturally take longer to fade compared to regular tint. The 24–48 Hour Rule One of the biggest mistakes is panicking too early. Fresh dye—especially hybrid formulas—often settles significantly after the client’s first few cleanses and natural oil production. In many cases, the brows soften naturally within a few days. Professional Removal & Correction Methods If the brows still feel too dark or uneven after 48 hours, here are the safest professional approaches: Gentle Cleansing: The simplest method is washing with an oil-free cleanser, brow shampoo, or micellar water. This gradually lifts excess surface pigment from the skin without aggressive scrubbing, which can irritate the skin and damage brow hairs. Professional Dye Removers: Dedicated tint removers are the gold standard for artists. We highly recommend these professional solutions: Bronsun Dye Remover (30ml): A professional correction solution designed to gently lift excess dye from the skin during or immediately after tinting. Noemi Remover (50ml): A professional-grade stain and tint correcting solution designed to lift unwanted pigment from the eyebrow area. Light Exfoliation: Because hybrid dye stains the skin, very gentle exfoliation using soft cleansing cloths or mild pads can help fade the skin stain faster. This should be done with extreme care to avoid irritating freshly treated skin. What NOT to Use One of the biggest problems online is DIY “removal hacks” that can damage the skin barrier or weaken brow hairs. Avoid: Bleach Harsh alcohol products Lemon juice Baking soda scrubs Strong oils immediately after treatment These methods can lead to: Skin irritation Dryness Patchy fading Compromised brow results Special Care for Laminated Brows If the client recently had brow lamination, extra caution is needed. Freshly laminated brows are delicate because the hair structure has been chemically softened. Over-cleansing or harsh removal methods can dry out the brow hairs, cause frizziness, or negatively affect the lamination result. Professional correction is always the safest route. Prevention: The Best Form of Correction The best way to handle overly dark brows is through prevention: Monitoring Processing Time: Keep a close eye on the clock for every client. Mapping: Use proper brow mapping techniques to ensure dye stays exactly where it belongs. Thin Layers: Apply the dye in thin, even layers to maintain control over the depth of colour. When to Seek Professional Help Clients should contact their brow artist if the brows appear extremely uneven, if the skin feels irritated, or if there is excessive staining outside the mapped shape. Professional correction is always safer than experimenting with home remedies. Achieving Cleaner, More Controlled Brow Corrections So, how do you remove eyebrow dye safely? The key is using gentle techniques, allowing time for natural fading, and relying on professional correction products when adjustments are needed. With the right approach, artists can refine shape, soften overly dark results, and maintain healthy-looking brows without compromising the skin or hair. Using professional removers like Bronsun Dye Remover and Noemi Remover also gives artists greater control when perfecting hybrid brows, brow tinting, and stain-based services. ✨ At Posh Deluxe, we provide professional brow artists with trusted products designed to support cleaner application, better corrections, and more customisable brow results.
Learn more
Do You Dye Eyebrows Before Lamination? The Correct Order Explained
One of the most common questions among brow artists is: do you dye eyebrows before lamination?Getting the order wrong can affect stain retention, hair integrity, and the final brow result. Understanding the correct order is important for achieving: Better colour results Healthier brow hairs More even pigment retention Longer-lasting brow styling In this guide, we’ll explain the correct professional sequence, why timing matters, and which products help you achieve flawless, long-lasting brows when performing both tinting and lamination services. Why Brow Lamination Changes the Hair Structure To understand the correct order, you first need to understand how brow lamination works. Brow lamination is a semi-permanent brow styling treatment that restructures the brow hairs using chemical solutions. The process: Softens the hair bonds Redirects the hairs into a new shape Sets the brows into place Because the hair cuticle temporarily opens during lamination, this affects how pigment absorbs into the hair. So, Do You Dye Eyebrows Before Lamination? The Short Answer, No. You should NOT dye eyebrows before lamination. In most professional brow services, the recommended order is: Brow lamination first Brow dye or hybrid tint second Why? Because applying dye after lamination allows: More accurate colour results Better visibility of the final brow shape More even pigment absorption Cleaner, more polished results Why Dyeing Before Lamination Can Be Problematic Brow lamination works by using perming solutions to open the hair cuticle and restructure the hair bonds so the brows can be reshaped. If you dye the brows first: The lamination solutions will strip or fade the tint The colour can become uneven or patchy Skin stain from hybrid dye will be removed You waste product and time re-tinting This is especially true when using hybrid systems like: Bronsun Eyelash & Eyebrow Dye Cream These dyes are designed to stain the skin, but lamination solutions will lift that stain off. The Correct Professional Order (Step-by-Step) Step 1: Cleanse and Prep Brows Proper prep ensures solutions and dye adhere correctly. Use: Noemi Brow Primer (50ml) or Bronsun Eyebrow Primer 50ml This removes oils and residue for even processing. Step 2 : Perform Brow Lamination First Use a professional lamination system: Thuya Permanent Gel (Step 1) to soften the hairs Thuya Neutralizer Cream (Step 2) to set them into the lifted shape At this stage, you are only restructuring the hair, no colour yet. Step 3 : Apply Hybrid Dye After Lamination Once lamination is complete and the hairs are set, you can safely apply hybrid dye for shape and density. Use: Bronsun Cream Developer 3% with your Bronsun dye for rich skin stain and long wear. Because the hair cuticle is now open from lamination, the dye actually absorbs better, creating: Stronger stain More even tone Longer-lasting colour on both hair and skin Step 4: Lock In the Colour After tinting, set and protect the pigment with: Bronsun Colour Fixing Lotion 50ml This step helps stabilise the shade and prevent over-development. Step 5: Finish with Nourishment Complete the service with: Noemi Color Care Finishing Gel (30ml) This hydrates the hairs and enhances shine after chemical processing. Why This Order Creates Better Brows When you laminate first and dye after: ✔ Brows stay lifted and fluffy ✔ Dye lasts longer on skin and hair ✔ Colour appears richer and more defined ✔ Results look fuller and professionally sculpted This is why top brow artists across Australia follow this exact sequence. When Might Artists Dye Before Lamination? Some advanced artists may occasionally tint first in very specific situations, such as: Extremely resistant grey hairs Certain corrective brow services Specific product system instructions However, for most modern brow systems, tinting after lamination remains the preferred approach. Tips for Better Brow Lamination Results To achieve professional results: ✔ Avoid Overprocessing Leaving solutions on too long can weaken the brow hairs. ✔ Choose High-Quality Products Poor-quality systems can affect both hair health and colour performance. ✔ Follow Proper Timing Always follow manufacturer guidelines for processing and dye application. ✔ Nourish the Brows Afterwards Hydration and aftercare help maintain healthy, glossy brows after treatment. Why Product Quality Matters Professional brow services depend heavily on the products you use. At Posh Deluxe Lash Supply, we focus on professional-grade brow products designed for: Reliable processing Better hair integrity Consistent colour results Long-lasting performance Final Thoughts for Brow Professionals So, do you dye eyebrows before lamination? In most professional brow services, the answer is no, artists typically perform the lamination first and apply tint or hybrid dye afterward for more predictable, polished results. Upgrade your brow treatments with professional products using professional systems from Thuya, Noemi, and Bronsun available at Posh Deluxe for modern brow lamination and hybrid brow services.
Learn more
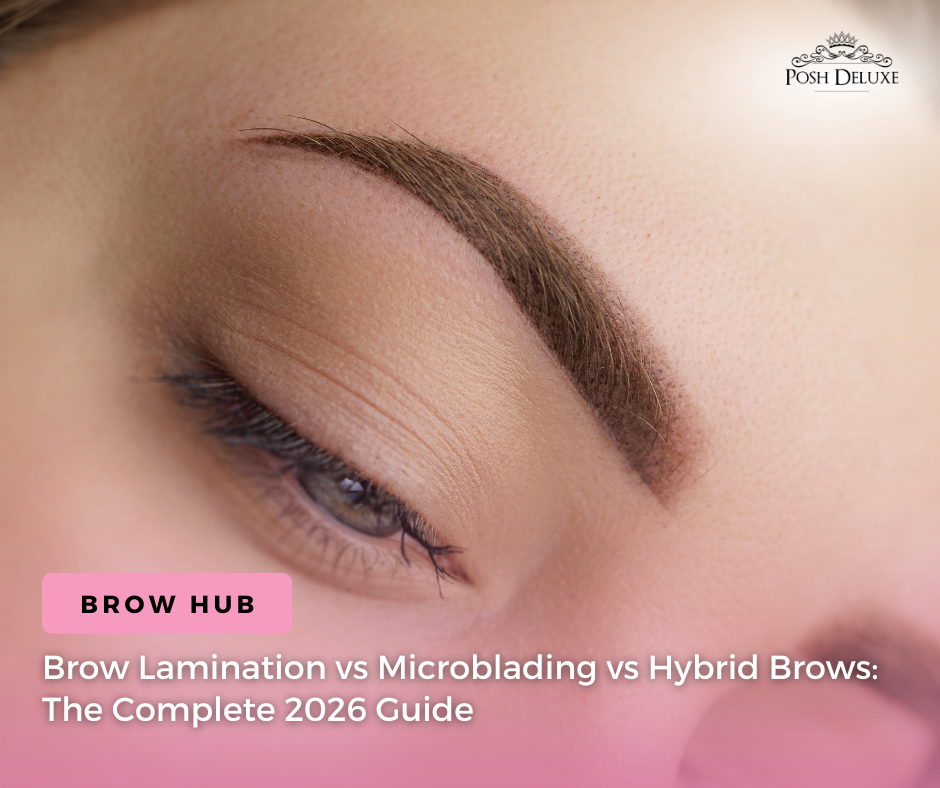
Brow Lamination vs Hybrid Brows: What’s the Difference?
With brow services continuing to dominate the beauty industry, many artists and clients are asking the same question: “What’s the difference between brow lamination vs hybrid brows?” While these treatments are often paired together, they actually serve very different purposes. At Posh Deluxe Lash Supply, we’re breaking down the key differences between brow lamination and hybrid brows, how each treatment works, and why offering both can enhance your brow services. Brow Lamination vs Hybrid Brows: The Main Difference The simplest way to explain it is this: Brow Lamination changes the direction and structure of the brow hairs Hybrid Brows focus on color, definition, and skin staining One is about shape and texture.The other is about pigment and fullness. Many artists combine both treatments for a complete brow transformation. What Is Brow Lamination? Brow lamination is a semi-permanent brow styling treatment that relaxes and redirects the brow hairs into a desired shape. Think of it as a “lash lift for the brows.” The process helps create the appearance of: Fuller brows Fluffier texture Better symmetry More controlled brow hairs It’s especially popular for achieving the “fluffy brow trend” seen across social media and editorial beauty looks. Who Is Brow Lamination Best For? Brow lamination works best for clients who have: Downward-growing hairs Curly or unruly brows Gaps caused by uneven hair direction “Cowlicks” in the brows Thin brows needing a fluffier appearance The treatment creates a more groomed, lifted effect without adding pigment to the skin. What Are Hybrid Brows? Hybrid brows use a hybrid dye formula that stains both: The brow hairs The skin underneath This creates a more filled-in, makeup-like appearance that lasts longer than regular tinting. Unlike brow lamination, hybrid brows focus primarily on: Definition Shape enhancement Color intensity Longer-lasting stain results Who Are Hybrid Brows Best For? Hybrid brows are ideal for clients who: Have sparse brows Want a more defined shape Love a makeup-style finish Want longer-lasting color Aren’t ready for cosmetic tattooing They’re especially popular among clients wanting structured, polished brows with minimal daily effort. Can You Combine Brow Lamination and Hybrid Brows? Absolutely! And many artists do. Combining both services creates: Fluffy structure from lamination Bold definition from hybrid dye; fills in gaps with skin stain Fuller-looking brows overall; creates the illusion of thicker, perfectly shaped brows This combination is one of the most requested modern brow treatments because it delivers both: ✔ Shape ✔ Color To perfect the result, artists also prep and finish with: Noemi Brow Primer (50ml) for proper cleansing before dye Bronsun Colour Fixing Lotion 50ml to lock pigment after tinting Noemi Color Care Finishing Gel (30ml) to nourish and protect brows post-service All available at Posh Deluxe for artists who want complete system control. Why Artists Should Offer Both Services Understanding the difference between brow lamination vs hybrid brows helps artists customise treatments more effectively. Offering both services allows you to: Cater to more brow concerns Increase service value Create fully customised brow transformations Stay competitive in the beauty industry Clients love personalised services—and combining techniques helps deliver better results. Why Product Quality Matters Whether you’re performing brow lamination or hybrid brows, your products directly affect: Hair health Longevity Pigment performance Client satisfaction At Posh Deluxe Lash Supply, we focus on professional-grade products designed for both performance and brow health. Upgrade Your Brow Services with Professional Systems So, when it comes to brow lamination vs hybrid brows, the best treatment depends on your client’s goals. Choose brow lamination for fluffiness and hair control Choose hybrid brows for definition and long-lasting color Combine both for the ultimate brow transformation Understanding the difference helps artists create more customised, high-performing services clients will love. Ready to upgrade your brow services? Explore professional brow products at Posh Deluxe Lash Supply, including Bronsun Professional Hybrid Dye! Now available for artists who want next-level results.
Learn more
What Are Hybrid Brow? A Complete Guide for Brow Artists and Clients
If your clients are asking for longer-lasting, fuller-looking brows without committing to tattooing, then you’ve likely heard the term hybrid brows. But what are hybrid brows, and why are they quickly becoming one of the most requested services in the industry? At Posh Deluxe we’re breaking it down and introducing why Bronsun Professional Hybrid Dye is the go-to solution for achieving this trending brow look. What Are Hybrid Brow? Hybrid brow is a modern eyebrow tinting technique that colours both the brow hairs and the skin beneath using a specially formulated hybrid dye. Unlike traditional brow tints that primarily stain the hair, hybrid dyes create a defined, filled-in brow look by leaving a visible stain on the skin for several days while maintaining long-lasting colour on the hair for weeks. This technique has quickly become a favorite among brow artists because it delivers the effect of brow makeup without makeup, giving clients fuller, more sculpted brows that last. How Hybrid Brow Dye Works Hybrid dyes are formulated to sit between regular tint and henna. They: Penetrate the hair shaft for long-term colour retention Stain the skin for a soft powder-brow effect Provide rich, even pigment without harshness Allow customised shade mixing for precise colour matching The result is a crisp brow shape, enhanced definition, and longer wear compared to traditional tinting methods. Why Brow Artists Prefer Hybrid Brow Professional brow stylists love hybrid brow services because they offer: ✔ Longer-lasting results Skin stain can last up to a week, while hair colour can remain visible for up to 7 weeks. ✔ Defined brow mapping The skin stain helps artists create precise shapes and symmetry. ✔ Ideal for sparse or uneven brows Hybrid dye fills visual gaps by staining the skin where hair is minimal. ✔ Customisable tones Shades can be mixed to suit every client’s undertone and hair colour. Who Is Hybrid Brow Best For? Hybrid brows are perfect for clients who: Have sparse or patchy brows Want a fuller, makeup-like brow look Prefer low-maintenance beauty routines Want longer-lasting tint results Love soft ombré or powder-brow effects Hybrid Brow Dye vs Traditional Brow Tint (What Actually Lasts Longer?) When we talk about how long a brow colouring lasts, we need to separate two different outcomes: ✔ Skin Stain Duration This is how long the colour shows on the skin between the brow hairs, often what gives that “powder brow” or filled-in effect. Traditional brow tint: Skin staining is usually minimal or nonexistent. Hybrid brow dye: Skin staining can last up to 7 days (depending on skin type and aftercare). Winner for skin stain: Hybrid brow dye ✔ Hair Colour Duration This is how long the colour stays visible on the brow hairs themselves. Traditional brow tint: Lasts around 2–3 weeks Hybrid brow dye: Can last up to 6–7 weeks This is because hybrid dyes are formulated to penetrate deeper into the hair fibre, similar to how professional hair colour works, rather than just coating the surface. Winner for hair colour: Hybrid brow dye Why Hybrid Brow Dye Appears “Longer Lasting” When people say hybrid brow dye lasts longer, they usually mean: 🔹 The hair colour lasts significantly longer than traditional tint. 🔹 The skin stain adds a brow-enhancing effect that extends the visible definition beyond what traditional tint can achieve (even after the hair colour fades). So, even though the skin stain lasts up to ~7 days, the overall brow look feels longer lasting because the hair colour persists for weeks, giving both shape and colour that stay defined longer. Introducing Bronsun Professional Hybrid Dye At Posh Deluxe, we’re excited to offer Bronsun Professional, a premium system trusted by brow artists worldwide. Why Choose Bronsun Professional? High-performance hybrid formula Rich pigmentation for bold, defined results Even staining on both skin and hair Wide shade range for perfect customisation Long-lasting, reliable results Bronsun allows artists to create clean, crisp brow shapes with a soft gradient or bold finish, depending on your client’s preference. Why Now Is the Time to Offer Hybrid Brows The demand for low-maintenance, high-impact beauty services continues to grow and hybrid brows are at the center of that trend. By adding hybrid brows to your service menu, you can: Attract new clients Increase treatment value Deliver longer-lasting results Stay ahead of industry trends So, what are hybrid brows? They’re the perfect balance between tint and henna, offering long-lasting color, defined shape, and a fuller brow appearance without the need for permanent treatments. Upgrade Your Brow Game with Bronsun Professional At Posh Deluxe, we provide professional artists with the tools they need to create standout results. ✨ Bronsun Professional Hybrid Dye is now available at Posh Deluxe, designed to help you deliver bold, beautiful, and long-lasting brows your clients will love. 👉 Shop Bronsun today and start offering the hybrid brow service everyone is asking for.
Learn more
How to Tape Eyes for Eyelash Extensions: A Step-by-Step Guide for Lash Artists
Perfecting how to tape eyes for eyelash extensions is one of the most underrated skills in lash artistry. While many artists focus on application and adhesive, proper taping is what sets the foundation for clean isolation, better visibility, and flawless results. Done correctly, taping can dramatically improve your speed, accuracy, and client comfort. Done incorrectly, it can lead to irritation, poor access, and uneven lash sets. At Posh Deluxe, we’re breaking down the professional techniques every lash artist should know. Why Proper Eye Taping Matters Learning how to tape eyes for eyelash extensions isn’t just about holding down the lower lashes, it’s about creating the ideal working surface. Proper taping helps: Secure lower lashes away from upper lashes Improve visibility of inner and outer corners Prevent lash stickies Enhance precision and control Keep your client comfortable throughout the service How Taping Affects Lash Placement Proper taping directly improves your ability to: Isolate each lash cleanly Place extensions accurately (0.5–1mm from lash line) Avoid stickies and clumping Achieve a more uniform lash set Simply put: better taping leads to better lash extension placement. Tools You’ll Need Before you begin, make sure you’re using the right tools: Eye pads (gel or lint-free) Medical-grade tape (gentle on skin) Tweezers for precision placement High-quality materials ensure better adhesion and reduce the risk of irritation. Step 1: Apply Eye Pads Correctly Start with clean, dry under-eye skin. How to apply: Place the eye pad 1–2mm below the lower lash line Ensure all lower lashes are covered Avoid placing pads too close to the eye to prevent discomfort Pro Tip: Ask your client to gently close their eyes naturally, no squeezing. Step 2: Check for Hidden Lower Lashes Even with eye pads, some lower lashes may still peek through. What to do: Use your tweezers to gently lift and check Look closely at inner and outer corners Ensure no lower lashes are exposed This step is crucial to avoid top and bottom lashes sticking together. Step 3: Use Tape for Extra Security Now comes the key part of mastering how to tape eyes for eyelash extensions. Tape placement techniques: 1. The Lift Technique Place tape on the eyelid Gently lift upward This exposes more natural lashes for easier access 2. The Side Stretch Technique Apply tape from the outer corner Pull slightly outward Helps reveal corner lashes and improves isolation 3. The Inner Corner Lift Use a small piece of tape Gently lift the inner corner area Improves access to short, delicate lashes Step 4: Ensure Client Comfort Taping should never feel tight or uncomfortable. Check for: No pulling sensation Eyes fully closed (no gaps) No irritation or redness Always ask your client: 👉 “Does this feel comfortable?” Small adjustments make a big difference. Step 5: Final Check Before Lashing Before you begin application: ✔ All lower lashes are secured✔ No skin is pulling too tightly✔ Lash line is fully visible✔ Client is relaxed and comfortable This ensures a smooth and efficient lash session. Common Mistakes to Avoid Pads Too Close: Placing eye pads or tape on the waterline can cause chemical burns from adhesive fumes or physical irritation to the eye. Overstretching the Skin: If the tape is too tight, it can distort the natural lash direction, leading to a "wonky" set once the tape is removed. Skipping the Inner Corners: This leads to poor coverage and sets that look incomplete. Not "Detackifying": Always press your tape against the back of your gloved hand once before applying it to the client to reduce the "tug" during removal. Pro Tips for Better Taping Want to level up your technique? Keep these in mind: Use minimal tape only where needed Work symmetrically on both eyes Adjust taping depending on eye shape Combine eye pads and tape for best results Practice consistency to improve speed Why Tools Matter At Posh Deluxe, we understand that precision starts with the right tools. Using high-quality tape and under-eye products ensures: Better grip without irritation Cleaner application process Improved client comfort Professional-level results Mastering how to tape eyes for eyelash extensions is a small step that creates a big impact. With proper taping, you’ll notice: Easier isolation Faster application Cleaner sets Happier clients It’s the foundation of every successful lash appointment. Upgrade your lash setup with professional lash tools from Posh Deluxe! Designed for precision, comfort, and flawless results every time.
Learn more
What Are Lash Fibres? The Foundation of Every Perfect Lash Set
If you are a professional lash artist, you handle thousands of tiny strands every week. But have you ever stopped to ask, what are lash fibres made of? While the industry uses marketing terms like "Silk," "Mink," or "Cashmere," the reality is a bit more scientific and much more vegan-friendly. At Posh Deluxe, we believe that understanding your materials is just as important as mastering your technique. When you know the chemistry of your fibres, you can better predict how they will behave with your adhesive and how they will stand up to your client's daily life. What Are Lash Fibres? Lash fibres are the individual synthetic strands used to create eyelash extensions. These fibres are designed to mimic the look and feel of natural lashes while offering enhanced durability, consistency, and performance. Each extension you apply, whether classic or volume lash extension, is made from carefully engineered lash fibres that determine: Texture (soft or firm) Finish (matte or glossy) Weight (lightweight vs heavier feel) Curl retention Overall appearance What Are Lash Extension Fibres Made Of? Modern lash extension fibres are typically made from synthetic materials, most commonly: PBT (Polybutylene Terephthalate) This is the industry standard for high-quality lash extensions. Why PBT? Heat-resistant (maintains curl) Lightweight and flexible Durable for long-lasting wear Can be manufactured in different finishes (matte, semi-matte, glossy) At Posh Deluxe, we use premium Korean PBT fibres known for their superior softness and consistency. Why Fibre Quality Dictates Your Results Not all lash fibres are created equal, and the difference becomes obvious the moment you pull them off the strip. High-Quality Fibres: These hold their curl over time, feel soft to the touch, and feature a consistent surface that bonds perfectly with professional adhesives. Low-Quality Fibres: Often containing "fillers," these can feel stiff or plastic-like, lose their curl quickly, and lead to poor client satisfaction or retention issues. If you’ve ever struggled with uneven sets or lashes that "pop off" during a brush-through, the quality of your lash fibres could be the hidden culprit. Technical Specifications: Finish and Diameter To achieve the "Posh" look, you must choose the right fibre for the specific aesthetic. 1. The Finish The finish of your fibres defines the intensity of the lash line: Matte Fibres: These absorb light rather than reflecting it, creating a soft, sophisticated, and natural appearance. Glossy Fibres: These reflect light for a shiny, more dramatic, and intense look. Semi-Matte Fibres: A versatile balance that works for almost any set. 2. The Diameter Choosing the correct diameter is essential for safe application and proper weight distribution, including better lash extension retention and comfort. 0.03mm – 0.05mm: Ultra-fine fibres ideal for Volume and Mega Volume. 0.07mm: The industry standard for Volume fans. 0.10mm – 0.15mm: Used primarily for Classic sets. Fibre Quality and Retention One of the greatest advantages of premium PBT fibres is their interaction with adhesive. High-quality fibres allow for a clean microbead of adhesive at the base and provide a consistent surface for a secure bond. This directly reduces the risk of lifting or premature fallout, ensuring your work lasts through the full natural growth cycle. How Lash Fibres Affect Your Final Look Your lash fibres influence more than just performance; they define your artistry. They impact: How fluffy your volume fans appear How dark or soft your lash line looks The overall texture of your set Client comfort and satisfaction Even with perfect technique, using poor fibres can limit your results. Choosing the Right Lash Fibres When selecting lash fibres, consider: Your client’s natural lash strength Desired style (natural vs dramatic) Technique (classic, volume, mega volume) Your working environment and adhesive The right combination leads to better results with less effort. The Posh Deluxe Difference At Posh Deluxe, our lash fibres are designed for professional performance. We focus on: Premium Korean PBT material Consistent curl and diameter Matte black finish for a soft, luxurious look Lightweight fibres for maximum comfort Whether you’re creating a natural set or full volume fans, our fibres are engineered to support precision, retention, and artistry. So, what are lash fibres? They are the foundation of every lash set, the material that determines how your work looks, feels, and lasts. By choosing high-quality lash fibres, you’re not just improving your sets, you’re elevating your entire service. Ready to upgrade your lash game? Explore Posh Deluxe’s premium lash fibres and experience the difference in softness, retention, and performance.
Learn more