For lash artists, creating beautiful, customised sets is more than just applying extensions — it’s about designing a look that enhances each client’s unique eye shape. That’s where lash mapping comes in.
If you’ve been wondering how to do lash mapping like a pro, this guide will walk you through the process, breaking down the steps and tools you’ll need. With the right technique and the right supplies, lash mapping becomes your roadmap to flawless, consistent results every time.
What Is Lash Mapping?
Lash mapping is the process of planning and marking out where different lash lengths, curls, and styles will be placed on the lash line. Think of it as a blueprint for your set — it ensures symmetry, balance, and a design tailored to your client’s eye shape and preferences.
Why Is Lash Mapping Important?
Before we dive into the "how," let's quickly reinforce the "why." Lash mapping is essentially your blueprint for a flawless lash set. It involves planning out the different lengths, curls, and thicknesses of extensions to be applied across the lash line. This meticulous planning ensures:
- Customisation: Tailored looks that enhance individual eye shapes and client desires.
- Symmetry: Balanced results across both eyes.
- Longevity: Correct weight distribution helps natural lashes support extensions better.
- Efficiency: A clear plan speeds up your application process.
- Client Satisfaction: Delivering consistent, high-quality results every time.
At Posh Deluxe, we believe education is fundamental to refining your lash artistry. That's why we don't just supply premium lash products; we empower you with the knowledge to use them expertly.
Step-by-Step: How to Do Lash Mapping
Mastering lash mapping might seem intricate at first, but with practice and the right approach, it will become second nature.
Step 1: Client Consultation & Eye Assessment
This is the foundation. Start with a thorough consultation. Discuss your client's desired look (e.g., natural, dramatic, cat eye, doll eye) and assess their natural lashes, eye shape, and facial features.

- Eye Shape: Almond, round, hooded, monolid, downturned, upturned.
- Natural Lash Health: Density, length, strength.
- Desired Effect: What "feel" are they going for?
Step 2: Cleanse & Prepare the Lashes

Ensure the natural lashes are pristine. Use a high-quality lash-safe foam cleanser to remove all makeup, oils, and residue. This creates a clean canvas for both mapping and application.
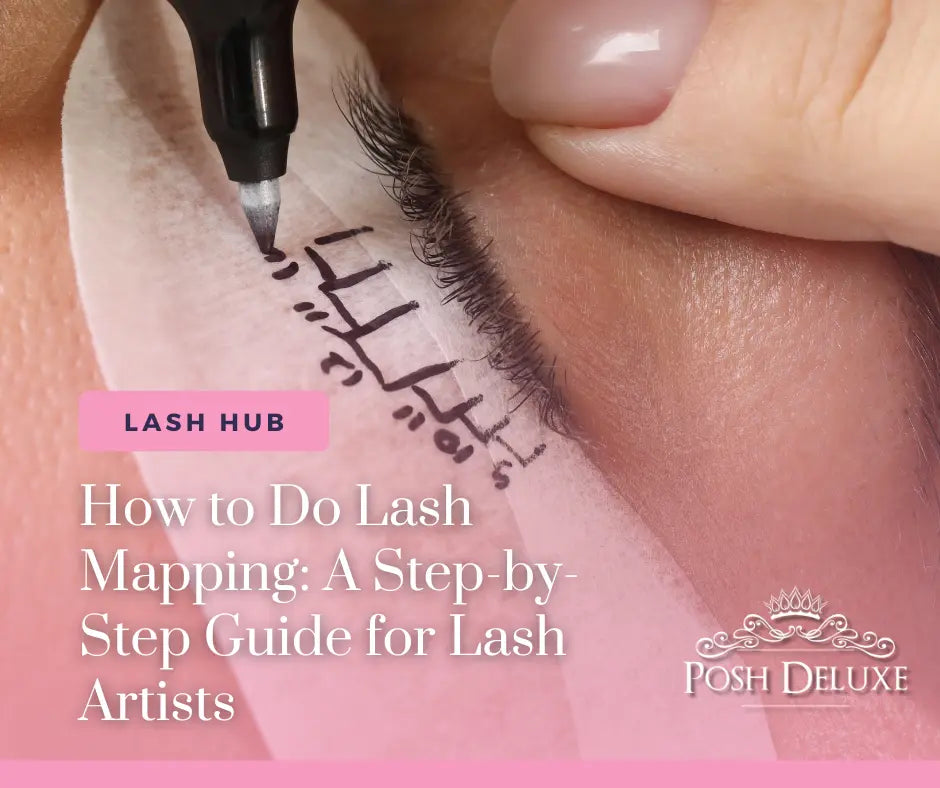
Step 3: Apply Eye Pads/Tape & Mark Your Zones
This is where the actual mapping begins.

- Secure Eye Pads: Gently apply hydrogel eye pads or medical tape to secure the lower lashes.
- Draw Your Lines: Using a pen on the eye pad, start by drawing vertical lines to divide the lash line into sections. Typically, you'll have 3-5 main sections, but this can vary.
- Identify the Iris: Mark the start and end points of the iris. This helps determine where the longest lashes will typically go for popular styles like doll eye.
- Inner and Outer Corners: Clearly mark the inner and outer corners where the shortest lashes will be placed to maintain safety and comfort.
Step 4: Determine Lash Lengths, Curls, and Thicknesses
Now, fill in your blueprint!

- Lengths: Write down the specific lash lengths (e.g., 8mm, 9mm, 10mm, 11mm) within each marked section. Remember to start shorter in the inner corner (e.g., 6-7mm) and gradually increase, then decrease towards the outer corner, or customise based on the desired effect.
- Curls: Decide on the curl type (e.g., C, CC, D, L, M) for each section. You might use a mix, for instance, a C curl for the inner corner and a D curl for the mid-to-outer sections for a lifted look.
- Thicknesses: Note the desired thickness (e.g., 0.03, 0.05, 0.07) for volume sets, ensuring it's appropriate for the natural lash's health.
Posh Deluxe Tip: Always keep the natural lash integrity in mind. Never overload a natural lash with an extension that's too long or too heavy. Our premium lashes are lightweight and designed for optimal retention and safety.
Step 5: Execute Your Map with Posh Deluxe Quality

Follow your lash map as a guide throughout the application. Isolate natural lashes with Posh Deluxe Isolation Tweezers (ISO-01 Flex Angel, or Stiletto) and apply fans or classic lashes with volume tweezers (Slim Boot, Swan, or Smile).
Your lash map will keep both eyes balanced and symmetrical.
Our extensive range of high-quality lash trays, adhesives, and tools from Posh Deluxe will ensure your application is smooth and your results are spectacular.
Popular Lash Mapping Styles to Master
While mapping is customised, there are popular styles that serve as excellent starting points:
- Natural Eye: Mimics natural lash growth, usually shorter in the inner and outer corners, longer in the middle.
- Doll Eye: Creates an open, rounded look by placing the longest lengths directly above the pupil.
- Cat Eye: Creates an elongated, sultry look by progressively increasing lengths towards the outer corner.
-
Squirrel Eye: A softer version of the cat eye, with the longest lengths slightly before the outer corner, then tapering down.
- Kim K/Wispy: Involves strategically placed longer "spikes" among shorter lengths for a textured, dramatic look
Tools that Make Lash Mapping Easier
At Posh Deluxe, we supply professional-grade tools that help lash artists master mapping:
-
Eye Pads & Lash Tape for clear mapping surfaces
-
Isolation & Volume Tweezers for clean application
-
Promade Fans in a variety of curls and dimensions
-
Adhesive Booster & Wrap Perfecto for maximum retention
Final Thoughts
Learning how to do lash mapping is one of the most important skills for any lash artist. It’s not just about placing extensions — it’s about designing a look that flatters and lasts.
With the right technique and high-quality supplies from Posh Deluxe, you’ll create lash sets that are precise, symmetrical, and tailored to every client’s style.
✨ Shop Posh Deluxe professional lash supplies today and take your lash mapping skills to the next level.


