Lash Hub Blog Posts

Can You Get Lash Extensions While Pregnant? An Australian Safety Guide
Important: this article provides general information from a professional lash artist perspective. It is not medical advice. Every pregnancy is different — always discuss cosmetic and beauty treatments with your GP, midwife or obstetrician before booking. If you have any pregnancy complications or concerns, defer to your medical team's advice. "Can I get lash extensions while pregnant?" is one of the most-asked questions in Australian lash studios — and one of the most poorly answered on the internet. Some sources say yes without qualification. Others say absolutely no. Neither is complete. For many healthy pregnancies, lash extensions can still be an option. However, pregnancy changes your body in many ways, so it's important to discuss any beauty treatment with your GP, midwife or obstetrician before booking. The honest answer is yes—many pregnant women continue wearing lash extensions throughout pregnancy—but there are four important considerations every client and lash artist should understand first. This guide covers exactly what changes during pregnancy that affects lash extensions, trimester-by-trimester considerations, what to talk to your lash artist about, when to skip a set entirely, postpartum guidance for returning to lashes, and what lash artists should do differently for pregnant clients. The Short Answer Lash extensions are generally considered safe during most of pregnancy for most women. There is currently no evidence to suggest that properly applied lash adhesive is absorbed into the bloodstream in amounts that would affect pregnancy, the bond is formed on the surface of the natural lash hair, not the skin, and cyanoacrylate cures within seconds of application. The four specific considerations that change during pregnancy are: Hormonal shifts can change your sensitivity to smells and chemicals — including adhesive fumes. Allergy risk changes as your immune system operates differently during pregnancy. Skin sensitivity often increases, especially in the eye and face area. Positioning becomes progressively harder, particularly in the third trimester when lying flat for hours isn't comfortable or medically ideal. Understanding these four factors is what separates a safe, comfortable lash appointment during pregnancy from an unpleasant or risky one. Should You Ask Your Doctor First? Although lash extensions are considered a cosmetic treatment, pregnancy is unique for every person. If you have any pregnancy complications, a history of allergies, or concerns about lying comfortably during a long appointment, it's always worth checking with your GP, midwife, or obstetrician before booking. What Pregnancy Actually Changes 1. Hormonal shifts and smell sensitivity Pregnancy dramatically alters your sense of smell. Adhesive fumes that were previously unnoticeable can become overwhelming — sometimes triggering nausea or headaches. This is entirely normal and usually most intense in the first trimester. Choosing a well-ventilated studio and a low-fume adhesive dramatically reduces the impact. 2. Immune system changes and allergy risk Your immune system operates differently during pregnancy. Some women develop new sensitivities they didn't have before — including to products they've used comfortably for years. Even if you've had lash extensions many times without issue, pregnancy can trigger a first-time reaction. This is uncommon but real, and it's the single biggest reason patch testing matters during pregnancy. Read our full guide on lash extension allergies — symptoms, causes and what to do for the complete picture on reactions. 3. Skin sensitivity increases Pregnancy hormones can make your skin more reactive — thinner, more prone to redness, and more sensitive to touch and pressure. The eye area is particularly vulnerable. Products, adhesives, and even the eye pads that felt fine before pregnancy can suddenly irritate. 4. Positioning becomes harder Lash appointments require you to lie flat on your back for 1.5 to 3.5 hours. In the third trimester, lying flat for extended periods becomes increasingly uncomfortable — and after around 20 weeks, most obstetricians recommend against lying completely flat on your back because of pressure on the vena cava (the major vein returning blood to the heart). This is a genuine physical constraint, not just discomfort. Trimester by Trimester Guidance First trimester (weeks 0–13) The most sensitive stage. Morning sickness and heightened sensitivity to smells mean adhesive fumes can trigger nausea. Many lash artists recommend waiting until after the first trimester before applying new full sets, especially for actively unwell women. If you already had extensions before falling pregnant, infills are generally fine — just plan around morning sickness timing. Second Trimester (Weeks 14–27) The second trimester is generally considered the safest and most comfortable time for lash appointments. Morning sickness has usually eased, smell sensitivity has settled, and most people can still lie comfortably for the duration of the appointment. This is also the ideal time if you're planning lashes for a special event, maternity photos, or your baby shower, as longer appointments are usually much more comfortable during this stage of pregnancy. Third Trimester (Weeks 28–40) During the third trimester, comfort and positioning become much more important. As your baby grows, lying flat on your back for long periods may become uncomfortable. In some cases, the weight of the uterus can put pressure on major blood vessels, which may reduce blood flow back to your heart and leave you feeling dizzy, light-headed, or nauseous. For this reason, you should be comfortable lying slightly on your side while keeping your head facing straight so your lash artist can work safely and accurately. This side-tilted position is generally more comfortable for you and helps reduce pressure from the baby on those major blood vessels. To make appointments more comfortable, we recommend: Infills rather than full sets, as they require less time. A slightly elevated or reclined bed (around 15–30 degrees). Wedge pillows or cushions to support your back and hips while allowing you to rest slightly on your side with your head kept straight. Many clients also choose to avoid appointments during the final four weeks before their due date, as sitting or lying still for extended periods often becomes more uncomfortable. If you have a wedding, baby shower, maternity photos, or another special event before your baby arrives, we recommend booking your appointment around 4–6 weeks before your due date, rather than leaving it until the very end of your pregnancy. Postpartum (after birth) Wait 4–6 weeks after birth before your first lash appointment. There are two reasons: Postpartum hair shedding (telogen effluvium) affects the natural lash cycle. Many women experience noticeable lash shedding 2–4 months after birth, which will reduce lash extension retention regardless of application quality. Physical recovery matters. Give your body time to heal — especially after a caesarean, where positioning can be uncomfortable. Consider classic extensions rather than volume for the first 2–3 postpartum sets — the lighter weight is more forgiving on natural lashes going through the shedding phase. The Adhesive Question — What the Science Actually Says Cyanoacrylate is the bonding chemical in lash adhesive. It cures within 1–3 seconds of contact with airborne moisture, forming a hard polymer bond on the surface of the natural lash hair. It is not absorbed through the skin. It does not enter the bloodstream. It cures on the surface of the natural lash and is not intended to come into contact with the skin. The actual pregnancy consideration with adhesive is the fumes — very small amounts of formaldehyde and other compounds released during the curing process. In a well-ventilated studio with a professional-grade adhesive, exposure is minimal. In a poorly ventilated home studio using cheap adhesive, exposure can be enough to trigger nausea or irritation in a sensitised pregnant client. Low-fume adhesive options: Bond Babe Adhesive from the Posh Deluxe range is formulated with lower fume release than standard pro adhesives — a good choice for pregnant clients or artists working in tighter studio spaces. What to Tell Your Lash Artist Before Booking Every pregnant client should share the following with their lash artist before the appointment: How many weeks pregnant you are. Any pregnancy complications (high blood pressure, preeclampsia risk, gestational diabetes, placenta previa). Any new sensitivities or allergies you've developed. Whether you've had lash extensions before pregnancy and how you tolerated them. Any body's positioning preferences or constraints. Whether you're comfortable lying flat, or would prefer a reclined position. Your medical team's guidance if they've given any. A professional lash artist will thank you for the information and adjust the appointment accordingly. If a lash artist dismisses your concerns or refuses to accommodate positioning changes, choose someone else. What to Avoid Completely During Pregnancy Lash extensions themselves are generally safe. Some adjacent beauty treatments are not — the chemistry involved is different from lash extension adhesive. Lash lifts — use perm-solution chemistry that some sources recommend avoiding during pregnancy. Discuss with your GP. Lash tinting — some tints contain PPD (paraphenylenediamine) and other chemicals that can be absorbed through the skin. Many professionals recommend discussing these treatments with your healthcare provider first. Brow lamination and brow tinting — same chemistry considerations as lash lifting and lash tinting. Extended appointments in one position after week 20 — position matters more than the products used. Any beauty treatment your GP or midwife has specifically asked you to avoid. Five Red Flags — When to Skip a Set Entirely Some pregnancy scenarios mean a lash appointment should be postponed rather than adjusted. If any of these apply to you, wait until after birth: Any active pregnancy complication (preeclampsia, gestational diabetes, placenta previa, cholestasis, or anything your medical team is actively managing). Extreme all-day nausea or hyperemesis gravidarum — any additional smell or discomfort during a long appointment is not worth it. You're on bed rest or have been advised to minimise physical exertion. Newly developed skin sensitivity or eczema in the eye area that wasn't there pre-pregnancy. You're within 2–3 weeks of your due date, when positioning risk is highest and the appointment isn't essential. For Lash Artists — Working with Pregnant Clients Many Australian lash artists regularly work with pregnant clients and understand how to adjust appointments to improve comfort and accommodate pregnancy-related changes. Here's the professional protocol: Always ask during booking or intake whether the client is pregnant, and if so, how many weeks. Update your intake form to include pregnancy-specific questions (complications, sensitivity changes, medical team guidance). Ensure your studio has good ventilation — running a small fan or extractor makes a significant difference to fume exposure. Stock a low-fume adhesive option specifically for pregnant clients and other sensitivity cases. Adjust positioning: elevated wedge pillows, reclined bed at 15–30 degrees after 20 weeks. Offer shorter appointments (infills only rather than full sets) as pregnancy progresses. Have products such as Anti Allergy Gel available to help minimise adhesive fumes and improve client comfort where appropriate. Take breaks during long appointments — a stretch and bathroom break every 45 minutes. Never dismiss a pregnant client's discomfort. If she wants to stop, stop. Patch test more readily than usual, particularly if the client is in her first pregnancy with your studio. Frequently Asked Questions Can I get eyelash extensions while pregnant? Generally yes, especially during the second trimester. There is no evidence that lash adhesive reaches the bloodstream or the baby. The four considerations are increased smell sensitivity, changed allergy risk, increased skin sensitivity, and positioning comfort — all of which can be managed by a professional lash artist. Always confirm with your GP or midwife. Are lash extensions safe in the first trimester? Physically yes, but many women find first-trimester appointments uncomfortable due to morning sickness and heightened smell sensitivity. Many lash artists prefer to wait until after week 12 for full new sets. Existing infills are generally fine if you tolerate the appointment. Are lash extensions safe in the third trimester? Yes, many clients continue to have lash extensions during the third trimester, provided they are comfortable throughout the appointment. The most important consideration is positioning. Rather than lying flat on their back, many pregnant clients are more comfortable lying on their side with their head kept straight and properly supported. This position can also be more comfortable for both mum and baby during longer appointments. If you're in your third trimester, let your lash artist know before your appointment so they can adjust your positioning and ensure you're as comfortable as possible. If at any point you feel uncomfortable, your appointment can be paused or adjusted as needed. Does lash adhesive reach the baby? No. There is currently no evidence to suggest that properly applied lash adhesive reaches the baby. Lash adhesive cures on the surface of the natural lash and is not designed to enter the body. If you have concerns, discuss them with your healthcare provider before booking. Can I get a lash lift while pregnant? Some lash professionals recommend postponing lash lifts during pregnancy because hormonal changes can affect both the lifting results and skin sensitivity. Always discuss cosmetic treatments with your healthcare provider if you're unsure. Can I get lash tinting while pregnant? Most obstetricians recommend avoiding lash tinting during pregnancy because some tints contain PPD (paraphenylenediamine) and other chemicals that can be absorbed through the skin. Traditional lash extensions do not have this concern. How soon after birth can I get lash extensions? Wait 4–6 weeks after birth minimum. Consider that postpartum hair shedding (telogen effluvium) starts 2–4 months after birth and affects lash retention — you may want to hold off on volume or mega volume sets until after this shedding phase. Can I get lash extensions while breastfeeding? Yes. Lash adhesive does not enter the bloodstream, and there is no concern about breastfeeding. Sleep deprivation might affect your aftercare consistency, which can shorten retention — plan for this. What if I develop a reaction during pregnancy? Stop the appointment immediately, rinse the eye area with saline solution, and contact your GP or midwife. Do not take antihistamines without medical advice during pregnancy. Read the full allergy guide here. The Bottom Line Lash extensions during pregnancy are generally safe for most women in most trimesters, when applied by a professional lash artist who understands the specific considerations that change during pregnancy. The second trimester is the ideal window. First trimester works if you're not battling severe nausea. Third trimester works with adjusted positioning and shorter appointments. Always tell your lash artist you're pregnant, share any complications or concerns, and defer to your medical team's guidance if there's any conflict. Get in touch with the Posh Deluxe team if you have questions about pregnancy lash appointments or need to book with an artist experienced in working with pregnant clients. Medical disclaimer: This article provides general information from a professional lash artist perspective. It is not medical advice. Every pregnancy is different — always discuss cosmetic and beauty treatments with your GP, midwife or obstetrician before booking. If you have any pregnancy complications, concerns, or symptoms during or after any lash appointment, contact your medical team immediately.
Learn more
How to Choose Lash Extension Diameter and Length: The Complete 2026 Guide
Lash extension diameter and length are the two most underestimated decisions in every lash appointment. Get them right and your set feels weightless, looks beautifully proportioned, and lasts the full natural lash cycle. Get them wrong and your extensions feel heavy, damage your natural lashes over time, and drop off in weeks — no matter how skilled the artist. This guide covers every diameter and every length available in the professional Australian market in 2026, how to match each to natural lash strength and eye shape, and how to build a complete lash-style kit that works across all your clients. What Diameter Means (And Why It Matters) Lash extension diameter is the thickness of the extension, measured in millimetres. A 0.03 mm lash is ultra-fine — thinner than a strand of human hair. A 0.20 mm lash is thick, heavy, and closer to a strip lash fibre. Every 0.02 mm increase in diameter roughly doubles the weight the natural lash is asked to carry. The absolute rule of lash extensions: an extension should never weigh more than the natural lash it's bonded to. Applying a heavy extension to a fine natural lash causes damage — the natural lash bends under the weight, sheds prematurely, and can permanently thin over months of wear. Every Diameter Explained 0.03 mm — Mega Volume Ultra-Fine The finest diameter in professional use. Perfect for building fans of 10, 12 or 14 lashes per natural lash without exceeding the safe weight. Feels weightless on the eye and gives the fluffiest possible mega volume look. Not suitable for classic technique — too fine to place individually. Shop the 0.03 mm range: 0.03 10D Rapid Promade Fans, 0.03 12D Rapid Promade Fans, plus DD volume trays in Champion Black Lashes. 0.05 mm — The Volume Workhorse The most-used diameter in professional volume application worldwide. Fine enough to build fans of 3–8 lashes safely, thick enough to give visible volume. If a lash artist could only stock one diameter, most would choose 0.05. Shop 0.05 volume options: Volume lash range, Champion Volume Lashes in all curls, and promade fans including 0.05 8D. 0.06 mm — The Balanced Volume Between 0.05 and 0.07 — slightly more visible than 0.05, gentler than 0.07. Good choice for volume fans of 2–5 lashes on medium-strength natural lashes. A popular hybrid-set diameter. 0.07 mm — The Bold Volume / Hybrid Standard The default diameter for hybrid sets and lighter volume looks. Delivers visible fullness with fans of 2–4 lashes. Also used in mega hybrid work when the client has strong natural lashes and wants pronounced texture. 0.10 mm — The Classic Standard The default diameter for classic (1:1) lash extensions. Delivers the mascara-like natural look most classic clients expect. Applied one extension per one natural lash — never used in fan form, as the weight of two 0.10 lashes on one natural lash exceeds safe limits. Shop 0.10 classic options: Champion Classic Lashes in every curl (available in 0.10 across the range). 0.15 mm — The Heavy Classic A thicker classic diameter delivering more dramatic mascara-like results. Only safe on clients with genuinely strong, thick natural lashes. Overapplied on delicate natural lashes, 0.15 causes visible damage within 2–3 sets. 0.18 mm and 0.20 mm — The Warning Zone These diameters exist in the market but are rarely recommended by educated lash artists. The extension weight approaches the weight of the natural lash itself, and long-term retention damage is almost inevitable. Most Australian professional educators do not recommend these diameters at all. Matching Diameter to Natural Lash Strength The single most important rule in diameter selection: assess your client's natural lash strength before choosing. A skilled lash artist runs a fingertip along the natural lash line before every appointment to feel the natural lash density and diameter. Fine, sparse natural lashes: 0.03 or 0.05 only. Never thicker. Medium natural lashes (most clients): 0.05, 0.06 or 0.07 for volume; 0.10 for classic. Strong, thick natural lashes: Any diameter up to 0.10; 0.15 for dramatic classic looks only. Damaged or recovering natural lashes: 0.03 only, or a break from extensions altogether to allow regrowth. What Length Means (And Why It Matters) Lash extension length is the length of the extension from base to tip, measured in millimetres — typically 7 mm at the shortest to 16 mm at the longest for professional use. The rule for length: an extension should never be more than 3 mm longer than the natural lash it's bonded to. Longer than that and the weight distribution becomes unstable, causing the extension to twist, droop, or shed prematurely. A well-chosen length looks proportionate to the eye and doesn't reach past the natural brow line. Every Length Explained 7–8 mm — The shortest lengths. Used at the inner corners of the eye where natural lashes are shortest. Rarely used across the whole set. 9–10 mm — Standard mid-length. The middle third of most lash sets uses lengths in this range for balanced proportion. 11–12 mm — Longer lengths for the outer third of the eye. Creates a lifted, cat-eye effect when placed at the outer corner. 13–14 mm — Long lengths for dramatic styling. Used for editorial, competition, and bold everyday looks on clients with strong natural lashes. 15–16 mm — Extra-long. Used only on clients with exceptional natural lash length and strength. High risk of natural lash damage if misapplied. For a deep dive on the shortest lengths and inner-corner styling: What Are the Shortest Lash Extensions?. Matching Length to Eye Shape Almond eyes: Standard proportion — shorter at inner corner (7–9 mm), medium mid-lash (10–11 mm), longer outer (12–13 mm). Round eyes: Emphasise outer corners — shorter inner (8 mm), medium (10 mm), significantly longer outer (13 mm+). Downturned eyes: Strong outer lift — longer at outer corner (13–14 mm) with D curl. Hooded eyes: Avoid extreme long lengths on the middle of the lash line — they get lost under the lid. Longer at outer corner only. Deep-set eyes: Uniform medium-length lengths (9–11 mm) with D or DD curl to bring the lashes forward visually. Wide-set eyes: Emphasise inner third with slightly longer lengths (10–11 mm) to visually pull the eyes closer together. Close-set eyes: Opposite — emphasise outer corners with longer lengths (12–13 mm) to visually widen. Mixed-Length Trays vs Single-Length Trays Professional lash trays come in two formats: Mixed-length trays: Contain multiple lengths across the tray (typically 7 mm through 12 mm or 13 mm through 16 mm in one tray). Efficient for lash mapping — you pick the length you need for each position without swapping trays. Single-length trays: Contain only one length. Useful when you need bulk quantities of a specific length (e.g. large classic sets using primarily 11 mm). Most working artists stock a mix of both — single-length in the workhorse mid-range (10–12 mm) and mixed-length for the shorter and longer end-points. Shop the full range: Champion Black Lashes collection — every curl, every diameter, every length, mixed and single-length trays. Building a Complete Lash Extension Kit A well-stocked working lash artist's kit typically includes: Classic 0.10 mm in C and CC (and often D) across lengths 8–14 mm. Volume 0.05 mm and 0.07 mm in C, CC and D across lengths 8–14 mm. Mega volume 0.03 mm in CC, D and DD across lengths 9–14 mm. L and M curls in 0.07 for hooded-eye clients (both classic and volume). A range of promade fans (3D through 12D) for speed. Start smaller as a new artist — one classic diameter, one volume diameter, three curls (C, CC, D), and mixed-length trays. Expand as your client base grows. Read more: How to Start a Lash Business in Australia, and Wholesale Lash Supplies Australia. Common Diameter and Length Mistakes Applying 0.07 volume fans to fine natural lashes. The fan weight exceeds what the natural lash can carry. Damage becomes visible over 2–3 sets. Using 0.10 classic on delicate natural lashes. Same problem — the extension is too heavy relative to the base lash. Choosing lengths based on client preference alone. The client wants 14 mm; her natural lashes are 6 mm. That's a 3+ mm mismatch and guaranteed retention failure. Uniform length across the whole lash line. Real lashes vary in length. Uniform extension length looks unnatural and unbalanced. Stocking too many diameters as a new artist. Master 0.05 and 0.10 before expanding. Diameter chaos hurts consistency. Overloading the outer corner. Very long outer-corner lashes can droop and drag the lash line down over time. Frequently Asked Questions What's the difference between 0.05 and 0.07 lash extensions? 0.05 mm is a finer diameter used for softer volume fans of 3–8 lashes. 0.07 mm is slightly thicker and used for hybrid sets or lighter volume fans of 2–4 lashes. 0.05 gives a softer look; 0.07 gives a more visible fullness. What diameter is best for mega volume lashes? 0.03 mm is the standard for mega volume — fine enough to build fans of 10, 12 or 14 lashes without exceeding safe weight on the natural lash. What length should my lash extensions be? Between 2 and 3 mm longer than your natural lashes for most positions, with shorter at the inner corner and longer at the outer corner. Your lash artist will assess this during consultation. Are 0.15 or 0.20 mm lashes safe? 0.15 mm is safe only on clients with genuinely strong, thick natural lashes and should not be used in fan form. 0.18 and 0.20 mm are not recommended by educated lash artists — the weight approaches or exceeds the natural lash weight and causes damage over time. How do I know how long my natural lashes are? Your lash artist measures during consultation. As a rough guide: natural lashes typically range from 5 to 12 mm depending on genetics. Most clients' natural lashes are around 7–9 mm at their longest. Can I get 14 mm lash extensions? Only if your natural lashes are at least 11 mm at their longest point. Otherwise, the weight distribution makes retention very poor and can damage your natural lashes. What's the most popular length for bridal lashes? Most bridal sets peak at 12–13 mm at the outer third of the eye, with 9–11 mm through the middle. Photographs beautifully without looking overdone. The Bottom Line Diameter and length are where the technical craft of lash extensions really lives. The right choices deliver sets that feel weightless, look proportioned, and protect the natural lash. The wrong choices produce heavy, uncomfortable, quickly-shedding sets that damage the natural lash over months. Match diameter to natural lash strength, match length to eye shape and natural lash length, and vary both across the lash line for a natural, flattering result. Browse the complete Posh Deluxe Champion Lashes range — every diameter, every length, every curl. For the companion pieces on choosing style and curl: see our complete lash curl guide and the Classic vs Hybrid vs Volume vs Mega comparison in the Lash Hub.
Learn more
Why Your Lash Extension Transitions Look Choppy (And How to Fix Them)
You know the mapping theory. You know your curls, your lengths, your zones. And yet — the set still comes out with a visible "step" somewhere along the lash line, a spot where it's obvious the length or curl just changed rather than gradually built. If this sounds familiar, the good news is it's rarely a single big mistake. It's usually one of a handful of small, fixable habits. Here's what's actually causing choppy lash extension transitions, and how to correct each one. Cause #1: Jumping Lengths Too Quickly This is the single most common cause of a visible "step" in a set. Going from, say, 8mm straight to 12mm in one jump creates an obvious edge the eye catches immediately — even if the curls and diameters are perfectly matched. The fix: Treat length changes like a gradient, not a switch. Move through intermediate lengths (increments of 0.5mm–1mm through your transition zones) rather than jumping straight to your target length. If you haven't revisited the fundamentals in a while, our Lash Mapping 101 guide is a good refresher on zone structure before you troubleshoot further. Cause #2: Skipping the Buffer Zone at the Inner Corner Even artists who graduate lengths well through the middle of the lash line often rush the innermost 2–3 lashes, applying a length that's too close to the rest of the inner zone instead of stepping it down further. This is what creates that slightly "heavy" or abrupt look right at the inner corner. The fix: Ultra-short lengths (4mm–6mm) aren't just for comfort — they're a mapping tool. Our guide on the shortest lash extensions breaks down exactly where and how to use them to soften this specific transition point. Cause #3: Changing Curl Without Changing Length to Match A lot of artists rely on curl change alone to signal a style shift — switching from a C to a D curl mid-line, for example — without adjusting length in the same zone. The result is a visible "wall" where the curl changes abruptly, even if the lengths look fine on paper. The fix: Curl and length need to transition together, not as two separate decisions. If you're changing curl through a zone, taper the length slightly through that same zone so the two shifts blend into each other rather than stacking on top of one another. Our Lash Curl C and D cheat sheet and our full curl guide both cover how to plan curl zones — the missing piece is simply remembering to pair that plan with your length graduation. Cause #4: Inconsistent Diameter Through the Transition Zone This one gets overlooked constantly. Even with perfect length and curl blending, an abrupt diameter change (say, jumping from 0.15mm to 0.20mm at the same point you're also changing length) reads as a density jump — the transition zone suddenly looks thicker or thinner than the rest of the line. The fix: Where possible, keep diameter consistent through a transition zone, or taper it as gradually as you're tapering length. If you're using multiple diameters across a set for weight or density reasons, try to stagger that change so it doesn't land on exactly the same lashes as your length or curl transition. Cause #5: Building Each Zone in Isolation It's common to map and apply one zone fully (say, the outer third) before moving to the next, checking each section against your plan rather than against the set as a whole. The problem is that a zone can look perfect in isolation and still create a visible seam once it meets the next section. The fix: Step back and view the whole lash line — ideally from the client's front-facing angle, not just from your working position — at two or three points during application, not only at the very end. Catching a seam while you're still mid-application is far easier to fix than after the set is finished. Cause #6: Uneven Handmade Fans If you're working in volume, inconsistent fan width or fibre spread between adjacent lashes can create a jagged look even when your length, curl, and diameter are all correctly graduated. One noticeably wider or narrower fan sitting right in a transition zone is often enough to disrupt the flow. The fix: Consistency in your fan-making is just as important as consistency in your mapping. Using PBT fibres that hold their shape reliably — like Posh Deluxe's Champion Volume Lashes — combined with Nano Notch tweezers for precise, even fan pickup, removes a lot of the guesswork here and keeps fan width consistent lash after lash. A Quick Mid-Application Check Rather than only assessing your work once the set is complete, build a short check into your process: Pause after the inner third, middle, and outer third are applied Step back and view the lash line from the client's front-facing angle Look specifically at the two or three lashes on either side of each transition point —not the zone as a whole This catches choppy transitions while they're still a two-lash fix, instead of a full-set redo. The Bottom Line Seamless lash extension transitions rarely come down to one variable. Length, curl, diameter, and fan consistency all need to move together through a transition zone — not just one of them. If your sets still have the occasional "step" despite solid mapping knowledge, it's worth checking each of these five points individually rather than assuming the whole technique needs an overhaul. Want your fan consistency to stop being part of the problem? A choppy transition is often a tool problem hiding behind a technique problem, inconsistent fibres or an unreliable tweezer grip will undo even perfect mapping. Explore Posh Deluxe's Champion Volume Lashes, engineered to hold their curl and diameter set after set, paired with our Nano Notch tweezers for a cleaner, more consistent fan pickup every time. If you're still refining your mapping fundamentals alongside your tool kit, browse our full range of lash trays, tools, and adhesives at Posh Deluxe, everything you need to make seamless transitions second nature, not a lucky outcome.
Learn more
How to Lash Faster on Clients With Full Natural Lashes
Every lash artist knows the feeling: your client sits down, closes their eyes, and you're greeted with a thick, healthy lash line — 150+ natural lashes per eye, baby lashes tucked in every gap. It's a dream for a dramatic, full-coverage set. It's also the appointment that quietly runs 45 minutes over. Full natural lashes aren't a problem to fix — they're a technique to master. If your sets are taking longer every time you get a dense-lash client, the fix usually isn't "go faster." It's isolating smarter, prepping better, and using tools built for volume from the start. Here's how to shave real time off these appointments without cutting corners on quality or retention. Why Dense Lash Lines Slow You Down Before you can speed up, it helps to know exactly where the extra time is going. With full natural lash lines, the drag usually comes from three places: More overlap. Densely packed lashes tangle and cross more easily, so isolation takes longer with every extension. More decision-making. More lashes means more micro-decisions about which natural lash to isolate next, which can slow your rhythm if you're not working off a plan. Higher stickie risk. Rushing isolation on a full lash line is the fastest way to bond two natural lashes together — and fixing a stickie costs far more time than isolating carefully the first time. The goal isn't to isolate less carefully. It's to remove the small inefficiencies around isolation so your actual technique can move faster. Start With the Right Prep A clean, well-prepped lash base is one of the most underrated speed tools in your kit. Oil, residue, and product buildup make natural lashes slippery and harder to separate — which is especially noticeable on a dense lash line where you're already isolating more strands per set. Priming with something like Wrap Perfecto Primer before you start strips away oils and rebalances the lash pH, giving you a cleaner, grippier surface to isolate from. Clients with fuller lashes also tend to have more natural oil across the lash line simply because there's more surface area — so don't skip this step to save two minutes. It'll cost you far more than that in isolation time. Isolation Techniques That Actually Save Time This is where most of your time savings will come from. A few techniques that make a real difference on full lash lines: Isolate with both tweezers. Use your non-dominant tweezer (or finger) to lift and separate surrounding lashes while your dominant tweezer isolates the target lash. On a dense lash line, this gives you a clear "lane" to work in instead of fighting overlap one-handed. Work in zones, not lash-by-lash. Rather than isolating and applying one at a time with no plan, section the lash line into zones (inner, middle, outer) and stay in each zone until it's complete. This reduces the back-and-forth eye movement that eats up time. Use tape for extra-dense lash lines. For clients with particularly thick lash lines, a strip of lash tape — like Skinergate or Nitto Alpha tape — placed just below the working row keeps lower layers out of the way and stops you from accidentally isolating the wrong lash. It's a small setup step that pays for itself on a full set. Tools Built for Precision at Speed Full lash lines mean more isolations per appointment, so tool comfort and precision matter more, not less. A few things worth checking in your kit: Isolation tweezers with a fine, consistent tip — the ISO-04 Angel or Straight Isolation Tweezers are built for clean isolation even when lashes are packed tightly together. Long-handled options, which can help maintain a lighter grip over longer full-lash appointments and reduce hand fatigue. Curved tweezers, for picking cleanly from the strip without disturbing neighbouring lashes. If your hand is cramping halfway through a full set, that fatigue slows your isolation just as much as the density of the lash line itself. The right tweezer for your grip is a speed tool, not just a comfort one. Choose an Adhesive That Keeps Pace With You A dense lash line means more extensions applied per session — so your adhesive needs to dry reliably fast without forcing you to slow down and wait between lashes. A dependable everyday formula like Bond Babe or Elite Bond, paired with Superbonder to lock in the bond once your set is complete, helps you move through a full lash line at a steady pace instead of pausing to babysit cure time. If you're working in a humid studio or during Australian summer, keep a high-humidity-tolerant adhesive on hand too — inconsistent cure times are one of the sneakiest ways a "quick" full set turns into a long one. For a full breakdown of prepping and pairing your adhesive correctly, see our Comprehensive Guide to Eyelash Primer and Adhesive. Map Before You Lash On a full lash line, deciding your style and placement as you go is one of the biggest hidden time-drains. Take 30–60 seconds before you start to mentally (or physically) map the set — where lengths change, where you're placing volume vs. classic, and where curls transition. When you already know what goes where, isolation and application become one smooth motion instead of isolate-pause-decide-apply. This is especially worth doing on dense lash lines, where the number of natural lashes gives you more room for the map to drift off-plan if you're improvising eye by eye. Speed Is a Byproduct, Not the Goal It's tempting to chase speed directly on a client with full lashes, but the artists who consistently work fast on dense lash lines got there by refining isolation accuracy first. Every stickie, every re-isolated lash, every fixed placement adds far more time than careful, well-paced isolation ever costs. Practise on your densest-lash clients specifically — track how long each zone takes, notice where you slow down, and refine that step. Over time, your hands will find the rhythm on full lash lines the same way they already have on average ones. Ready to build a kit that keeps up with your fastest, fullest sets? Explore our isolation tweezer collection and shop professional-grade adhesives and prep products designed for Australian lash artists at Posh Deluxe.
Learn more
Will Crying Ruin My Lash Extensions? What Lash Artists and Clients Need to Know
One of the most common questions lash artists hear from clients is: "Will crying ruin my lash extensions?" Whether it's a wedding, breakup, graduation, emotional movie, or simply a stressful day, many clients worry that tears will cause their lash extensions to fall out. The good news is that crying itself is unlikely to ruin properly applied lash extensions. Professional lash adhesives are designed to withstand normal exposure to moisture, including tears. However, excessive rubbing, friction, and poor aftercare habits can affect lash retention and leave extensions looking less than perfect. Let's look at what really happens when tears meet lash extensions and how lash artists can help clients achieve the best possible retention. Can Tears Damage Lash Extensions? In most cases, no. Once professional lash adhesive has fully cured, it is designed to withstand everyday exposure to moisture, humidity, sweat, and tears. A client having a normal cry is unlikely to experience significant lash loss simply because of the tears themselves. The bigger concern is what often happens during and after crying. Clients may: Rub their eyes Pull or tug at their lashes Press tissues against the lash line Sleep with damp lashes Aggressively remove smeared eye makeup These habits place mechanical stress on the extensions and are far more likely to cause premature shedding than tears alone. What Happens If a Client Cries Within 24 Hours of Their Appointment? The first 24 hours following a lash appointment are generally the most important period for retention. While modern adhesives cure much faster than older formulas, allowing the adhesive bond to stabilise properly helps maximise longevity. If a client knows they'll be attending an emotional event, it can be helpful to schedule their lash appointment a few days beforehand. Common examples include: Weddings Funerals Graduations Engagement parties Significant life events A fully stabilised adhesive bond will always perform better than one that has only recently been applied. Why Rubbing Is More Damaging Than Crying Most lash loss associated with crying is actually caused by friction rather than moisture. When clients rub their eyes, they can: Twist lash fans out of shape Damage handmade volume fans Break adhesive bonds Pull natural lashes prematurely from the follicle Create visible gaps throughout the lash line Encouraging clients to gently blot tears rather than wiping directly across their lashes can significantly improve retention. Does Salt in Tears Break Down Lash Adhesive? This is one of the biggest misconceptions in the lash industry. Although tears contain natural salts, the concentration is not high enough to immediately weaken properly cured professional lash adhesive. If a client notices lash loss after crying, the more likely causes are: Natural lash shedding Existing retention issues Excessive touching or rubbing Poor aftercare practices Incorrect adhesive performance for the working environment The tears themselves are rarely the main problem. How Lash Artists Can Improve Lash Retention Strong retention starts long before a client sheds a tear. Proper preparation, product selection, and curing techniques all contribute to longer-lasting lash extensions. Use the Right Adhesive Choosing an adhesive suited to your environment is one of the most important factors in retention. Products such as Bond Babe Adhesive are designed to deliver strong retention while maintaining low-fume performance across a wide range of humidity conditions. Using fresh adhesive and monitoring room temperature and humidity can help ensure consistent results. Prepare Natural Lashes Properly Oil, makeup residue, and debris can compromise the adhesive bond. Professional preparation products such as Wrap Perfecto help remove excess oils while creating optimal conditions for lash attachment. Proper preparation can improve adhesion and support stronger retention from day one. Optimise Adhesive Curing Products such as Superbonder can be applied at the end of the treatment to accelerate the curing process and improve bond flexibility. By helping seal adhesive fumes and creating a stronger, more elastic bond, Superbonder can contribute to better retention and increased client comfort. Educate Clients on Aftercare Even the best application can suffer if aftercare is neglected. Clients should be reminded to: Avoid rubbing their eyes Clean lashes regularly Brush lashes daily Remove makeup carefully Avoid oil-based products around the lash line Consistent aftercare remains one of the biggest contributors to long-term retention. What Should Clients Do After Crying? If a client has had an emotional day, a few simple steps can help keep their lash extensions looking their best. Gently Pat Away Moisture Avoid rubbing. Use a tissue or soft cloth to gently absorb tears without disturbing the lash extensions. Allow Lashes to Dry Let the lashes air dry naturally or use a handheld lash fan. Brush Through the Lashes Once dry, use a clean spoolie to separate and realign the extensions. Cleanse If Necessary If tears have mixed with makeup or skincare products, cleanse the lashes using a professional lash cleanser to keep the lash line clean and healthy. Wedding Clients: The Most Common Concern Brides often ask whether crying during their ceremony will ruin their lash extensions. In reality, lash extensions are often a better option than mascara for emotional events. Unlike mascara, lash extensions won't run, smudge, or create dark streaks under the eyes when tears appear. With quality application, proper curing, and good aftercare, most brides can enjoy their special day without worrying about a few happy tears. The Verdict: Will Crying Ruin Lash Extensions? No—crying alone is unlikely to ruin properly applied lash extensions. The biggest threats to retention are: Eye rubbing Excessive touching Poor aftercare Improper adhesive performance Natural lash shedding For lash artists, strong retention starts with quality products, correct preparation, and proper curing. For clients, gentle handling and consistent aftercare are the keys to maintaining beautiful lashes between appointments. A few tears are nothing to worry about. Just remember: dab, don't rub. Your lashes will thank you. Professional Lash Retention Products for Lash Artists Looking to improve lash retention for your clients? Explore the professional lash artist range from Posh Deluxe Lash Supply, including Bond Babe Adhesive, Wrap Perfecto, Superbonder, Lash Shampoo, and other retention-focused products designed to help artists achieve stronger, longer-lasting lash extension results.
Learn more
Lash Extension Allergy: Symptoms, Causes and What to Do
Lash extension allergies are not common — but they do happen, and when they happen, they need to be taken seriously. The challenge for both clients and lash artists is that real allergic reactions can look very similar to ordinary irritation, and getting the diagnosis wrong leads to wasted appointments, lost trust, and (in serious cases) genuine eye damage. This guide explains exactly what a lash extension allergy looks like, what's actually causing the reaction, how to tell allergy apart from simple irritation, what to do if it happens to you, and how lash artists can reduce the risk for clients prone to sensitivity. First, the Honest Statistics Genuine allergic reactions to lash extensions are estimated to occur in 1 to 2 percent of clients — not 10 or 20 percent as social media sometimes suggests. The vast majority of "allergic reactions" people post about online are actually irritation reactions, which look similar but are caused by different things and respond to different treatment. The important distinction: allergy is your immune system reacting to a specific substance. Irritation is your tissue reacting to a physical or chemical trigger. They look similar on the outside but require completely different responses. The Difference Between Allergy and Irritation Irritation (the most common reaction) Irritation reactions typically: Show up within minutes to hours of the appointment. Cause mild redness, watering, and a stinging sensation. Resolve completely within 24–48 hours on their own. Affect both eyes equally. Are usually caused by adhesive fumes during application or contact with the skin during the appointment. Allergic reaction (rarer, more serious) Genuine allergic reactions typically: Develop 24–72 hours after the appointment (sometimes longer). Cause significant swelling of the eyelids. Produce intense itching that doesn't ease with eye drops. Cause redness that spreads beyond the lash line onto the eyelid and surrounding skin. May be worse on the second appointment than the first — allergies develop with repeated exposure. Don't resolve until the trigger is removed. What Causes a Lash Extension Allergy? The most common trigger in lash extension allergy cases is the adhesive used during application — specifically the cyanoacrylate-based bonding agents or carbon-based pigments that give the glue its dark colour. Other potential triggers include: Cyanoacrylate (bonding agent): the primary sensitising component in most lash adhesives Carbon black pigment: used to darken adhesive, may cause sensitivity in some clients Latex in tapes or pads: can trigger reactions in clients with latex allergies Formaldehyde release: trace amounts may be released as adhesive cures, especially in poorly stored or expired products Pre-treatment products: primers, cleansers, or removers in sensitive individuals Rare cases: sensitivity to eye pads, tape adhesives, or environmental factors The lash extensions themselves (PBT fibre) are considered highly biocompatible and rarely a cause of allergic reactions. Symptoms of a Lash Extension Allergy If you experience any combination of these symptoms 24–72 hours after a lash appointment, you may be having an allergic reaction: Swollen, puffy eyelids — sometimes severely puffy. Intense itching that drives you to rub your eyes. Redness across the eyelid and lash line. Watering eyes that won't stop. Discharge from the eye (clear or yellow). A burning or stinging sensation that doesn't ease. Skin around the eye that's hot to touch. In severe cases, the eye may swell shut. What to Do If You Have a Reaction (Client Guide) Don't rub your eyes. Rubbing makes everything worse and risks damaging the cornea. Contact your lash artist immediately. They need to know — partly so they can help you, partly so they can stop the same thing happening to other clients with the same adhesive batch. Apply a cold compress for 10–15 minutes at a time to reduce swelling. Use a clean cloth — never ice directly on the skin. Use saline eye drops to rinse and soothe the eye area. Avoid eye drops with active ingredients (redness reducers, lubricants) unless prescribed. Seek medical advice from your GP, pharmacist, or healthcare provider. They can properly assess the reaction and recommend appropriate treatment based on your individual circumstances. For severe reactions, arrange professional lash removal as soon as possible. Removing the extensions helps eliminate ongoing exposure to the adhesive and may assist with recovery. Seek urgent medical attention immediately if you experience severe swelling, vision changes, significant pain, difficulty opening your eyes, or any symptoms that rapidly worsen. Have the extensions professionally removed. Don't try to remove them at home — this risks damage to your natural lashes. Your lash artist (or another professional) can do a safe removal. What to Do If Your Client Has a Reaction (Lash Artist Guide) As a lash artist, your duty of care is real. Here's the professional response: Listen and take it seriously. Even mild reactions deserve full attention. Get a clear description and photos. Document the reaction for your records. Offer a free professional removal. Standard professional response in this situation. Refer to a doctor or pharmacist if symptoms are significant. You are not a medical professional. Refund where appropriate. Builds long-term trust — even when the reaction may not be your fault. Update your client intake form to flag this client for future appointments and document any product they reacted to. How to Reduce Allergy Risk Reducing the risk of lash extension irritation and allergic reactions requires a combination of correct technique, controlled environment, and professional product selection. While no system can completely eliminate sensitivity risks, lash artists can significantly reduce complications by following structured lash protocols. For lash artists Always use fresh, properly stored adhesive (never expired or contaminated) Conduct patch testing for new or sensitive clients Maintain proper ventilation to reduce fume exposure Ensure adhesive does not touch the skin (0.3–0.5 mm placement rule) Use latex-free tapes and pads as standard practice Educate clients on the difference between irritation and allergic reaction Avoid overloading adhesive, which increases fume exposure For clients Tell your artist about any allergies (cosmetic, environmental, medication) before booking. Ask for a patch test if you've had a reaction to anything similar in the past. Avoid getting lash extensions immediately after a major skincare change or new medication. Don't have lash extensions applied right before a major event — book a trial set first so any reactions appear before the big day. How Patch Testing Works A patch test is exactly what it sounds like — a small test before the full appointment. The protocol: 7. Apply a small number of extensions (typically 3–5) using the actual adhesive you plan to use for the full set. 8. Wait 24–48 hours. Allergic reactions usually appear within this window. 9. Inspect the area for redness, swelling, itching, or other reactions. 10. If no reaction, proceed to the full set. If any reaction, discuss alternative products with your artist before continuing. 11. Advise the client that they may still react after a full set even if they are clear on the patch test. Patch testing isn't perfect — some allergies only develop after repeated exposure — but it dramatically reduces the risk of a full-set reaction. Sensitive Products in the Posh Deluxe Range For clients with known sensitivities or a history of irritation, selecting appropriate professional products can help support a more comfortable lash application process. At Posh Deluxe Lash Supply, we offer a range of products designed to support cleaner application, improved retention, and better-controlled working environments for lash professionals. Anti Allergy Gel — Designed to help reduce the presence of airborne adhesive fumes in the lash workspace. It is commonly used in professional studios to support a more comfortable treatment environment during application. Important: This product is an environmental support tool only and does not prevent or treat allergic reactions or sensitivities to lash adhesives. Bond Babe Adhesive — A professional-grade adhesive designed for strong retention with reduced fume levels compared to standard lash glues. Suitable for classic, promade, and volume lash applications. Posh Deluxe Lash Shampoo — A professional-grade adhesive designed for strong retention with reduced fume levels compared to standard lash glues. Suitable for classic, promade, and volume lash applications. Wrap Perfecto — A professional pre-treatment product that prepares the natural lashes by removing excess oils and improving adhesive performance for more precise application results. Superbonder - A professional retention and curing enhancer that helps seal adhesive bonds, reduce residual fumes, and improve lash retention. Often used as a finishing step to create a more comfortable experience for sensitive clients while strengthening the longevity of lash extensions. Frequently Asked Questions Can you be allergic to lash extensions? Yes — though true allergic reactions are rare, affecting an estimated 1–2% of clients. The most common allergen is cyanoacrylate (the bonding agent in lash adhesive). Reactions typically appear 24–72 hours after the appointment. What does a lash extension allergy look like? Significant swelling of the eyelids, intense itching, spreading redness on the eyelid and surrounding skin, and watering or discharge. Symptoms typically appear 24–72 hours after application and don't resolve until the adhesive is removed. How is allergy different from irritation? Irritation appears within minutes to hours, causes mild redness and stinging, and resolves within 24–48 hours on its own. Allergy appears 24–72 hours after application, causes significant swelling and itching, and doesn't resolve until the trigger is removed. Can I become allergic to lash extensions after having them before? Yes. Allergies often develop with repeated exposure. Many clients have their first set without issue and develop a reaction on a later appointment as their immune system builds sensitivity over time. Is there a hypoallergenic lash adhesive? There's no truly hypoallergenic lash adhesive — all cyanoacrylate adhesives carry some allergy risk for sensitised clients. However, low-fume, low-formaldehyde-release formulations like Bond Babe Adhesive are gentler choices for sensitive clients. What should I do if my client is having a reaction during the appointment? Stop the appointment immediately, gently rinse the eye area with saline solution, apply a cold compress. If symptoms are severe (significant swelling, eye swelling shut, severe pain), refer to urgent care or hospital immediately. Do not attempt to remove the extensions yourself if the client's eyes are reactive — wait for the swelling to subside. Can I patch test myself at home? No. Lash adhesive should never be used outside a professional setting. A proper patch test should always be done by a qualified lash artist. The Bottom Line Lash extension allergies are real but uncommon — and the vast majority of "allergic reactions" are actually short-lived irritations. Knowing the difference matters for both clients and lash artists. If you experience genuine allergy symptoms, get the extensions professionally removed, take an antihistamine, and consider patch testing before your next appointment. Lash artists should make patch testing routine for sensitive clients, stock low-fume adhesive options on hand. Browse the full Posh Deluxe range or contact us if you have specific questions about sensitivity.
Learn more
How to Choose the Right Lash Shampoo: The Complete Australian Guide
The single biggest mistake clients make with their lash extensions has nothing to do with the artist who applied them. It has nothing to do with the products used. It has nothing to do with the weather. It's the moment, on Day 1, when they get home — and decide not to wash their lashes because they're scared of touching them. For the next three weeks, makeup, sweat, sunscreen, dead skin cells and natural facial oil quietly build up at the base of every single extension. By week two, the adhesive bond is being eaten away from underneath. By week three, half the set is gone — and the client is convinced their lash artist did something wrong. This is why lash shampoo isn't optional. It's the single most important aftercare product your clients will ever buy — and the wrong one can be just as damaging as not washing at all. Why Lash Shampoo Isn't Optional Three things happen at the base of lash extensions every single day, and they all need to be removed: Sebum (your natural skin oil). Your face produces oil constantly — even more in hot Australian summers. Sebum slowly breaks down cyanoacrylate (the adhesive that holds extensions to your natural lashes). Makeup, sunscreen, and cleanser residue. Even small amounts of foundation, primer, eye cream or moisturiser migrate down to the lash base over the course of a day. Dead skin cells. They build up at the lash line, become food for microscopic lash mites (Demodex), and quietly weaken the bond. When clients don't wash their lashes daily, retention drops by up to 50%. The set that should have lasted six weeks is gone in three. Eye infections become more likely. The base of the lashes feels gritty. And, often, the lash artist takes the blame for what is actually a hygiene issue. The bottom line: daily lash washing isn't an optional extra. It's the difference between a set that lasts and a set that doesn't. Why Regular Face Wash and Makeup Remover Are Dangerous This is where most clients go wrong. They assume "I already wash my face every day, that should be enough." Unfortunately, almost every standard skincare product is the worst possible choice for lash extensions: Most face washes contain oil. Even ones marketed as "oil-free" often contain emollients (squalane, glycerin, butter, silicones) that behave like oil on the lash bond. Eye makeup remover is almost always oil-based. It's designed to dissolve waterproof mascara — which is the same chemistry as dissolving lash adhesive. Makeup wipes deposit cotton fibres into the lashes and require rubbing — which physically tears extensions out. Bar soap is too alkaline. It strips the natural pH balance of the lash and skin around the eye. Some "gentle" cleansers contain niacinamide or retinol. Both can interact with lash adhesive over time. A purpose-made lash shampoo is the only product that's been formulated specifically to clean lash extensions without degrading the adhesive bond. This is not marketing fluff — the chemistry actually matters. The Five Things to Look for in a Quality Lash Shampoo 1. Oil-free (read the ingredients, not the marketing) The label says "oil-free" on almost every lash shampoo on the market. But the ingredient list often tells a different story. Look out for hidden oil-like ingredients: squalane, glycerin in high concentration, plant butters, silicone derivatives (anything ending in -cone or -siloxane), and mineral oil. 2. Sulphate-free Sulphates (SLS and SLES) are harsh detergents commonly used in regular shampoos. They strip the natural protective oil layer on the lash hair and can cause irritation in the delicate eye area. Quality lash shampoos use gentler surfactants. 3. Paraben-free Parabens are preservatives that have been linked to skin irritation, especially around the eye. Modern lash shampoos use safer preservation systems. 4. pH-balanced The natural lash sits at a slightly acidic pH (around 4.5 to 5.5). A quality lash shampoo matches that — strongly alkaline cleansers disrupt the lash hair and adhesive surface. 5. Designed specifically for lash extensions Some brands take a generic face cleanser, rebrand it as a "lash cleanser," and sell it at a premium. A genuine lash shampoo is formulated from scratch for use with cyanoacrylate adhesive bonds — not adapted from a different category. Foam vs Liquid: What's the Difference? Most professional lash shampoos come in one of two formats: Foam (pump dispenser): Easier for clients to apply, less waste, lower risk of over-saturation. Foam is pre-diluted to the perfect concentration, meaning your client gets consistent results every wash. This is the better choice for home retail. Liquid (concentrate): More precise for professional use. Lash artists often dilute liquid concentrate for in-salon pre-treatment cleansing. Posh Deluxe Lash Shampoo comes in a 60ml foam dispenser — see product — designed specifically for daily home use by clients. How to Apply Lash Shampoo Properly Step-by-step process for clients to follow every day: Wet the eye area lightly with cool or lukewarm water — never hot. Pump foam onto a clean lash brush (a soft fan brush or a dedicated lash cleansing brush — never your fingertips). Close your eye gently and sweep the brush downwards over the closed lid and along the lash line. Focus on the base of the lashes — that's where the cleaning happens. Continue with gentle side-to-side motions along the lash line. Never rub up and down the body of the lashes. Rinse with cool water until all the foam is gone. Look down into the basin or shower — don't tilt your head back. Pat dry with a soft microfibre cloth. Never rub with a regular towel — the loops snag on extensions. Brush the lashes once dry with a clean spoolie to fan them out and reset the curl. Tip: buy a pack of disposable cleansing brushes for your client — they're the best applicator and cost almost nothing per use. How Often Should Lash Extensions Be Washed? The honest answer: every single day. Here's the realistic guide: Once a day, every day: the absolute minimum. Twice a day: for clients with oily skin, or anyone who wears makeup daily. Immediately after sweating (gym session, hot day, hot yoga) — sweat is salt water + oil and is brutal on the adhesive bond. Always before bed if they've worn eye makeup — even a small amount of mascara residue overnight is enough to weaken the bond. The first 24 hours after application is the only exception — no water on the lashes during the initial cure period. From day 2 onwards, daily washing is essential. Common Lash Shampoo Mistakes Skipping it because the lashes feel fine. By the time they don't feel fine, the bond is already damaged. Wash daily regardless. Using fingers instead of a brush. Your fingers re-deposit oil and don't reach the base of the lashes where the cleaning needs to happen. Washing only the body of the lashes, not the base. The base is where sebum and product collect. Wash there. Hot water. Use cool or lukewarm — heat softens the adhesive over time. Not drying properly. Damp lashes attract more residue and can clump. Pat with microfibre and brush once dry. Rubbing instead of patting. Friction is the enemy of lash retention. Posh Deluxe Lash Shampoo: What Makes It Different Posh Deluxe Lash Shampoo comes in a 60 ml foam pump (with a bulk-buy option for high-volume salons). It's been formulated specifically for use with lash extensions in Australian conditions: Oil-free, sulphate-free, paraben-free. No hidden emollients. pH-balanced to match the natural acidic state of the lash surface. Foam format for easy, accurate at-home application. Tested in Australian conditions by Paola Yit and the Posh Deluxe team before being released to the catalogue. Pairs with disposable cleansing brushes for a complete retail bundle. For Lash Artists: Stocking Lash Shampoo as Retail Lash shampoo should be in every single client's hand when they leave their appointment. Not optional, not upsold reluctantly — built into the price and the experience. Here's why this matters for your business: It protects your work. Clients who wash daily come back rebooking infills, not complaining about retention. Repeat retail revenue. A 60 ml bottle lasts a typical client 6–8 weeks. That's a built-in restock cycle aligned with infill bookings. Healthy retail margins. Typical markup on lash shampoo is 40–60% — meaningful side revenue per appointment. Reduces "problem" clients. The single biggest cause of retention complaints is lack of home washing. Solve it at the source. Build it into your standard new-set price. Include a bottle plus brushes in every welcome kit. Tell every client: "This is what protects my work in your lashes for the next four weeks." They'll thank you. Frequently Asked Questions Can I use baby shampoo on lash extensions? No. Baby shampoo contains plant-derived oils and emollients that break down lash adhesive. The "tear-free" label refers to eye irritation, not lash compatibility. Can I use Cetaphil or a gentle cleanser on lash extensions? No. Cetaphil and similar "gentle" cleansers contain emollients (squalane, lanolin derivatives) that act like oil on lash extensions. Use a purpose-made lash shampoo. How long does a 60ml bottle of lash shampoo last? With daily use, a 60 ml bottle of foam lash shampoo lasts approximately 6 to 8 weeks for a single user — neatly aligned with the typical lash infill cycle. Does lash shampoo make extensions fall out faster? The opposite. Proper lash shampoo extends retention significantly. Clients who wash daily can see 50% better retention than clients who don't wash at all. Should I wash my lashes on Day 1 after application? No. The first 24 hours is the curing window — no water, no steam, no makeup. From Day 2 onwards, daily washing is essential. My lash shampoo stings my eyes — is that normal? No. A quality, pH-balanced lash shampoo should not sting. If it does, the formulation is too alkaline or contains harsh surfactants. Switch to a professional lash shampoo. Can I use lash shampoo on my face too? Yes, especially around the eye area. Many clients prefer it as their full eye-area cleanser because it removes makeup without the oil residue of dedicated removers. The Bottom Line Lash shampoo is the single highest-leverage aftercare product in your routine. Used daily, with the right product, you can stretch retention from 3 weeks to 6. Used wrong (or skipped), you'll be back in the lash chair every two weeks wondering why your sets aren't lasting. Shop Posh Deluxe Lash Shampoo or browse the full aftercare collection to build a complete home routine.
Learn more
What Are Hybrid Brow? A Complete Guide for Brow Artists and Clients
If your clients are asking for longer-lasting, fuller-looking brows without committing to tattooing, then you’ve likely heard the term hybrid brows. But what are hybrid brows, and why are they quickly becoming one of the most requested services in the industry? At Posh Deluxe we’re breaking it down and introducing why Bronsun Professional Hybrid Dye is the go-to solution for achieving this trending brow look. What Are Hybrid Brow? Hybrid brow is a modern eyebrow tinting technique that colours both the brow hairs and the skin beneath using a specially formulated hybrid dye. Unlike traditional brow tints that primarily stain the hair, hybrid dyes create a defined, filled-in brow look by leaving a visible stain on the skin for several days while maintaining long-lasting colour on the hair for weeks. This technique has quickly become a favorite among brow artists because it delivers the effect of brow makeup without makeup, giving clients fuller, more sculpted brows that last. How Hybrid Brow Dye Works Hybrid dyes are formulated to sit between regular tint and henna. They: Penetrate the hair shaft for long-term colour retention Stain the skin for a soft powder-brow effect Provide rich, even pigment without harshness Allow customised shade mixing for precise colour matching The result is a crisp brow shape, enhanced definition, and longer wear compared to traditional tinting methods. Why Brow Artists Prefer Hybrid Brow Professional brow stylists love hybrid brow services because they offer: ✔ Longer-lasting results Skin stain can last up to a week, while hair colour can remain visible for up to 7 weeks. ✔ Defined brow mapping The skin stain helps artists create precise shapes and symmetry. ✔ Ideal for sparse or uneven brows Hybrid dye fills visual gaps by staining the skin where hair is minimal. ✔ Customisable tones Shades can be mixed to suit every client’s undertone and hair colour. Who Is Hybrid Brow Best For? Hybrid brows are perfect for clients who: Have sparse or patchy brows Want a fuller, makeup-like brow look Prefer low-maintenance beauty routines Want longer-lasting tint results Love soft ombré or powder-brow effects Hybrid Brow Dye vs Traditional Brow Tint (What Actually Lasts Longer?) When we talk about how long a brow colouring lasts, we need to separate two different outcomes: ✔ Skin Stain Duration This is how long the colour shows on the skin between the brow hairs, often what gives that “powder brow” or filled-in effect. Traditional brow tint: Skin staining is usually minimal or nonexistent. Hybrid brow dye: Skin staining can last up to 7 days (depending on skin type and aftercare). Winner for skin stain: Hybrid brow dye ✔ Hair Colour Duration This is how long the colour stays visible on the brow hairs themselves. Traditional brow tint: Lasts around 2–3 weeks Hybrid brow dye: Can last up to 6–7 weeks This is because hybrid dyes are formulated to penetrate deeper into the hair fibre, similar to how professional hair colour works, rather than just coating the surface. Winner for hair colour: Hybrid brow dye Why Hybrid Brow Dye Appears “Longer Lasting” When people say hybrid brow dye lasts longer, they usually mean: 🔹 The hair colour lasts significantly longer than traditional tint. 🔹 The skin stain adds a brow-enhancing effect that extends the visible definition beyond what traditional tint can achieve (even after the hair colour fades). So, even though the skin stain lasts up to ~7 days, the overall brow look feels longer lasting because the hair colour persists for weeks, giving both shape and colour that stay defined longer. Introducing Bronsun Professional Hybrid Dye At Posh Deluxe, we’re excited to offer Bronsun Professional, a premium system trusted by brow artists worldwide. Why Choose Bronsun Professional? High-performance hybrid formula Rich pigmentation for bold, defined results Even staining on both skin and hair Wide shade range for perfect customisation Long-lasting, reliable results Bronsun allows artists to create clean, crisp brow shapes with a soft gradient or bold finish, depending on your client’s preference. Why Now Is the Time to Offer Hybrid Brows The demand for low-maintenance, high-impact beauty services continues to grow and hybrid brows are at the center of that trend. By adding hybrid brows to your service menu, you can: Attract new clients Increase treatment value Deliver longer-lasting results Stay ahead of industry trends So, what are hybrid brows? They’re the perfect balance between tint and henna, offering long-lasting color, defined shape, and a fuller brow appearance without the need for permanent treatments. Upgrade Your Brow Game with Bronsun Professional At Posh Deluxe, we provide professional artists with the tools they need to create standout results. ✨ Bronsun Professional Hybrid Dye is now available at Posh Deluxe, designed to help you deliver bold, beautiful, and long-lasting brows your clients will love. 👉 Shop Bronsun today and start offering the hybrid brow service everyone is asking for.
Learn more
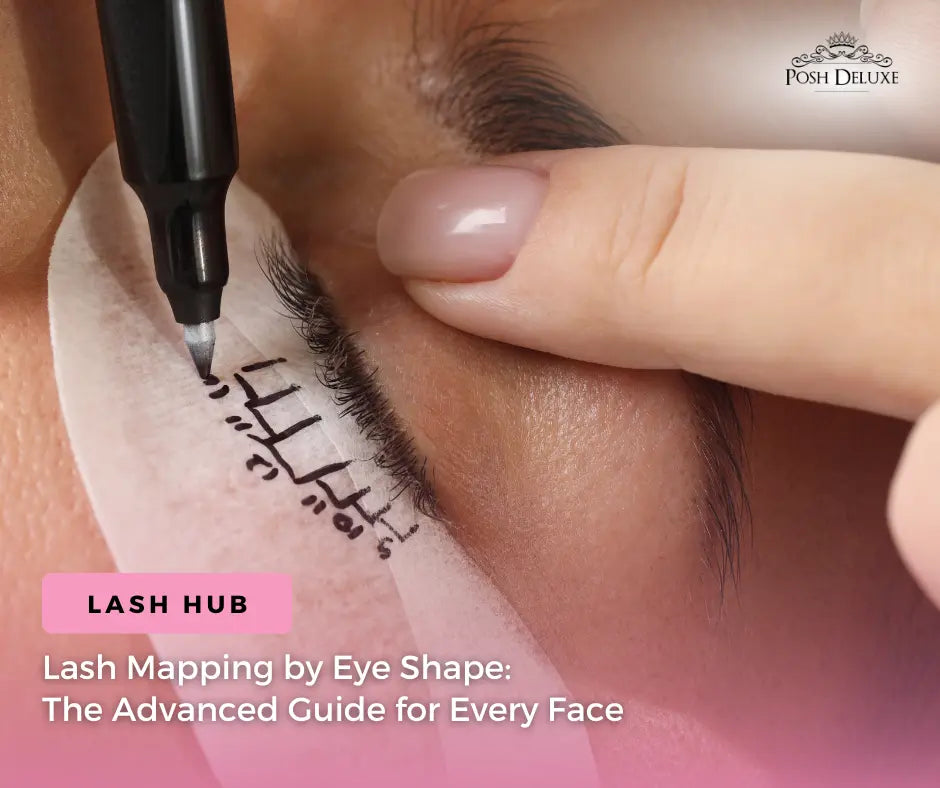
How to Tape Eyes for Eyelash Extensions: A Step-by-Step Guide for Lash Artists
Perfecting how to tape eyes for eyelash extensions is one of the most underrated skills in lash artistry. While many artists focus on application and adhesive, proper taping is what sets the foundation for clean isolation, better visibility, and flawless results. Done correctly, taping can dramatically improve your speed, accuracy, and client comfort. Done incorrectly, it can lead to irritation, poor access, and uneven lash sets. At Posh Deluxe, we’re breaking down the professional techniques every lash artist should know. Why Proper Eye Taping Matters Learning how to tape eyes for eyelash extensions isn’t just about holding down the lower lashes, it’s about creating the ideal working surface. Proper taping helps: Secure lower lashes away from upper lashes Improve visibility of inner and outer corners Prevent lash stickies Enhance precision and control Keep your client comfortable throughout the service How Taping Affects Lash Placement Proper taping directly improves your ability to: Isolate each lash cleanly Place extensions accurately (0.5–1mm from lash line) Avoid stickies and clumping Achieve a more uniform lash set Simply put: better taping leads to better lash extension placement. Tools You’ll Need Before you begin, make sure you’re using the right tools: Eye pads (gel or lint-free) Medical-grade tape (gentle on skin) Tweezers for precision placement High-quality materials ensure better adhesion and reduce the risk of irritation. Step 1: Apply Eye Pads Correctly Start with clean, dry under-eye skin. How to apply: Place the eye pad 1–2mm below the lower lash line Ensure all lower lashes are covered Avoid placing pads too close to the eye to prevent discomfort Pro Tip: Ask your client to gently close their eyes naturally, no squeezing. Step 2: Check for Hidden Lower Lashes Even with eye pads, some lower lashes may still peek through. What to do: Use your tweezers to gently lift and check Look closely at inner and outer corners Ensure no lower lashes are exposed This step is crucial to avoid top and bottom lashes sticking together. Step 3: Use Tape for Extra Security Now comes the key part of mastering how to tape eyes for eyelash extensions. Tape placement techniques: 1. The Lift Technique Place tape on the eyelid Gently lift upward This exposes more natural lashes for easier access 2. The Side Stretch Technique Apply tape from the outer corner Pull slightly outward Helps reveal corner lashes and improves isolation 3. The Inner Corner Lift Use a small piece of tape Gently lift the inner corner area Improves access to short, delicate lashes Step 4: Ensure Client Comfort Taping should never feel tight or uncomfortable. Check for: No pulling sensation Eyes fully closed (no gaps) No irritation or redness Always ask your client: 👉 “Does this feel comfortable?” Small adjustments make a big difference. Step 5: Final Check Before Lashing Before you begin application: ✔ All lower lashes are secured✔ No skin is pulling too tightly✔ Lash line is fully visible✔ Client is relaxed and comfortable This ensures a smooth and efficient lash session. Common Mistakes to Avoid Pads Too Close: Placing eye pads or tape on the waterline can cause chemical burns from adhesive fumes or physical irritation to the eye. Overstretching the Skin: If the tape is too tight, it can distort the natural lash direction, leading to a "wonky" set once the tape is removed. Skipping the Inner Corners: This leads to poor coverage and sets that look incomplete. Not "Detackifying": Always press your tape against the back of your gloved hand once before applying it to the client to reduce the "tug" during removal. Pro Tips for Better Taping Want to level up your technique? Keep these in mind: Use minimal tape only where needed Work symmetrically on both eyes Adjust taping depending on eye shape Combine eye pads and tape for best results Practice consistency to improve speed Why Tools Matter At Posh Deluxe, we understand that precision starts with the right tools. Using high-quality tape and under-eye products ensures: Better grip without irritation Cleaner application process Improved client comfort Professional-level results Mastering how to tape eyes for eyelash extensions is a small step that creates a big impact. With proper taping, you’ll notice: Easier isolation Faster application Cleaner sets Happier clients It’s the foundation of every successful lash appointment. Upgrade your lash setup with professional lash tools from Posh Deluxe! Designed for precision, comfort, and flawless results every time.
Learn more